
User's Manual
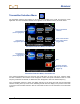
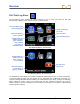
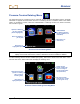
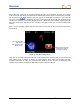
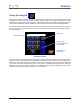
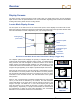
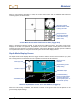
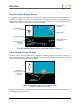
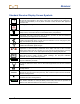
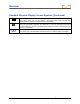
Table Of Contents
- Safety Precautions and Warnings
- Dear Customer:
- Introduction
- Receiver
- General Description
- Toggle and Trigger Switches
- Audible Tones
- Installing and Removing the Battery Pack
- Power On
- Power Off
- Main Menu
- Locate Mode
- Calibration Menu
- Height-Above-Ground (HAG) Menu
- Settings Menu
- Transmitter Selection Menu
- Drill DataLog Menu
- Pressure-Tension DataLog Menu
- Using the Keypad
- Display Screens
- Standard Receiver Display Screen Symbols
- Transmitter
- Remote Display
- Battery Charger
- System Setup
- Locating
- The Target Steering Function
- Appendix A: System Specifications and Maintenance Requirements
- Appendix B: Projected Depth Versus Actual Depth and the Fore/Aft Offset
- Appendix C: Calculating Depth Based on Distance Between FLP and RLP
- Appendix D: Reference Tables
- LIMITED WARRANTY

Receiver
DigiTrak
®
F5™ Operator’s Manual 23
Pressure-Tension DataLog Menu
The pressure-tension (P-T) DataLog menu is used with the fluid pressure transmitters and the TensiTrak
transmitter. It appears as shown below when the P-T DataLog function is disabled, which is the default
setting. To enable the function, select the enable/disable P-T DataLog function icon, shown red below;
the icon will turn green.
Pressure-Tension DataLog Menu
NOTE: Enabling the P-T DataLog function allows you to record a P-T DataLog job. The P-T data will
display on the locate mode screen, however, whether the function is enabled or disabled.
To start recording, with the function enabled (icon green), select exit to return to the main menu. Then,
from the main menu, select locate mode to display the following menu.
Pressure-Tension DataLog Recording Menu
Description of
highlighted option
Exit (opens locate
mode screen; no data
recording will occur)
Description of
highlighted option
Delete P-T DataLog
job or jobs
Enable/disable
P-T DataLog function
(green if enabled, red
if disabled)
Exit (returns to
main menu)
Upload P-T DataLog
job to a computer
(shown highlighted)
Append existing job
(opens an existing
job to continue
recording data)
Create new job
(opens locate mode
screen and begins
recording data under
new job number)