
User's Manual


System Setup
58 DigiTrak
®
F5™ Operator’s Manual
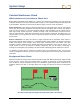
Calibrate Receiver to Transmitter
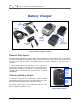
The receiver must be calibrated to the transmitter prior to first-time use and each time a different
transmitter, receiver, or drill head is used. The transmitter must be installed in the drill housing during the
calibration procedure (see “Transmitter Housing Requirements” in the Transmitter section).
There are two calibration options: 1-point calibration (with the transmitter above ground) and 2-point
calibration (with the transmitter below ground). The preferred method is 1-point calibration. The 2-point
method is rarely needed and should only be used with caution. Both methods are described below. A
tape measure is required for both calibration methods.
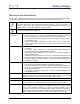
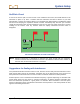
The calibration menu is accessed from the receiver main menu. When you select the calibration menu,
the calibration option previously used is highlighted for selection.
Receiver Calibration Menu Screen
To cancel the calibration procedure, toggle right until the exit option is highlighted then click the trigger.
You will return to the main menu with no change to the calibration.
NOTE: DCI does not recommend calibrating every day, but you should verify the receiver’s depth
reading daily at several locations using a tape measure.
Do not calibrate if:
You are within 10 ft (3 m) of metal structures, such as steel pipe, chain-link fence, metal siding,
construction equipment, automobiles, etc.
The receiver is over rebar or underground utilities.
The receiver is in the vicinity of excessive electrical interference.
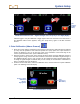
The signal strength from the transmitter is less than 300 points (too low) or greater than 950
points (too high). If the signal is not within the specified range during calibration, a calibration
failure screen will display indicating low or high signal strength, as shown below.
Exit (Returns
to Main Menu)
1-Point
Calibration
(Shown
Highlighted)
2-Point
Calibration