
User's Manual


Using Software
36 Eclipse
®
TensiTrak
®
Operator’s Manual
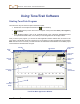
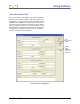
Menu Bar
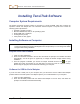
Under each menu on the menu bar (File, Edit, Port, and Help) are commands for running the Eclipse
TensiTrak program. Many of the commands are similar to those used in other Windows programs. This is
particularly true for the File and Help menu commands. The menu commands are summarized below.
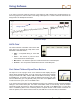
File Menu Commands
¾ New – Creates a new blank project screen.
¾ Open – Opens an existing project.
¾ Save – Saves an opened project using the same file name.
¾ Save As – Saves an opened project to a specified file name
and folder.
¾ Print – Prints a project.
¾ Print Preview – Displays the project on the screen as it would
appear printed.
¾ Print Setup – Selects a printer and printer connection.
¾ Recent Files – Allows you to click on the filename of a recently
opened project to open the file immediately.
¾ Exit – Exits Eclipse TensiTrak program.
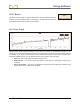
Edit Menu Commands
¾ Job Info – Allows entry or editing of data in the Job Information
field, which includes address, date, time, system, and design
load.
¾ Chart AutoScaling – Allows you to toggle the autoscaling
feature on and off. The autoscaling feature automatically determines adequate ranges for the X
and Y axes depending upon the data points uploaded.
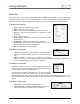
Port Menu Commands
The Port menu has four options, which are listed as 1, 2, 3, and 4.
These numbers represent the COM ports available. The Port menu
is used to select a port for transferring data.
To determine the computer’s available ports, open your computer’s
Control Panel and click on the System icon to open the System
Properties dialog box. Click on the Hardware tab and then the Device Manager option at the top to
open the Device Manager dialog box. Click on “Ports” in the listing to view the available ports on your
system.
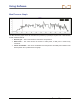
Help Menu Commands
¾ Help Topics – Opens Eclipse TensiTrak Help file.
¾ About TensiTrak – Provides software version number and
copyright information for Eclipse TensiTrak software.