
User's Manual
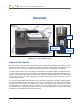
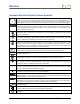
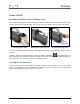
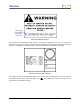
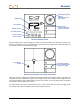
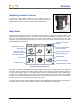
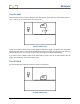
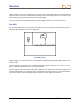
Table Of Contents
- This device complies with Part 15 of the Rules of the FCC. Operation is subject to the following two conditions: (1) this device may not cause harmful interference, and (2) this device must accept any interference received, including interference tha...
- Safety Precautions and Warnings
- Dear Customer:
- Introduction
- Receiver
- Transmitter
- Remote Display
- Battery Charger
- Locating
- The Target Steering Function
- Appendix A: System Specifications and Maintenance Requirements
- Appendix B: Projected Depth Versus Actual Depth and the Fore/Aft Offset
- Appendix C: Calculating Depth Based on Distance Between FLP and RLP
- Appendix D: Reference Tables
- Appendix E: EU Required Documentation
- LIMITED WARRANTY

Receiver
DigiTrak
®
F2
®
Operator’s Manual 13
Power On/Off
Installing and Removing the Battery Pack
Insert a fully charged DigiTrak F Series battery pack so that it is flush with the back of the receiver and the
tab is securely latched, as shown below. If necessary, push on the battery pack to latch the tab in place.
Inserting
Battery
Pack
Battery Pack Fully Inserted
Removing Battery Pack
To remove the battery pack, push down on the battery tab and pull it away from the unit until the tab is
released.
Check the charge on the battery pack by pushing the battery status button
on the battery pack; the
LEDs will illuminate to indicate the amount of charge on the battery. See the Battery Charger section for
more information on checking, removing, and recharging a battery.
Turning On the Receiver
To turn on the F2 receiver once the battery is properly installed, hold in the trigger for 1 second, and then
release it. You will hear a short beep followed by a long beep. The first screen you will see is the warning
screen, which will appear every time you turn on the unit.
Tab
Battery
Status Button