
User's Manual
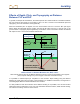

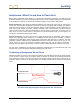
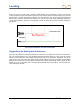

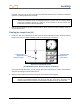
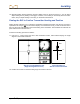
Table Of Contents
- Safety Precautions and Warnings
- Dear Customer:
- Introduction
- F Series Battery Charger System
- Receiver
- General Description
- Standard Receiver Display Screen Symbols
- /Power On
- Power Off
- Automatic Shutdown
- Toggle & Trigger Switches
- Audible Tones
- Main Menu
- /Calibration Menu
- /Height-Above-Ground (HAG) Menu
- /Settings Menu
- Transmitter Selection Menu
- /DigiTrak LWD (Log While Drilling) Menus
- Target Steering Menu
- Using the Keypad
- Display Screens
- Transmitter
- Remote Display
- Locating
- The Target Steering Function
- Appendix A: System Specifications and Maintenance Requirements
- Appendix B: Projected Depth Versus Actual Depth and the Fore/Aft Offset
- Appendix C: Calculating Depth Based on Distance Between FLP and RLP
- Appendix D: Reference Tables
- Appendix E: EU Required Documentation
- LIMITED WARRANTY

Locating
62 DigiTrak
®
F5
®
Operator’s Manual
Marking Locate Points
The locate points (FLP and RLP) and the locate line (LL) must be found and accurately marked during the
locating procedure. To mark a locate point after you have found it, stand with the receiver level and
directly above the locate point. Look down the vertical axis that runs through the center of the display to
project a plumb line to the ground (see figure below). The point where this plumb line hits the ground is
the location that you should mark.
Plumb Line for Marking Locate Points
HANDLING THE RECEIVER
NOTE: It is critical that you hold the receiver correctly to obtain accurate readings. You must hold the
receiver level at all times and maintain a constant height-above-ground (HAG) distance
that matches the value set on the receiver (see “Height-Above-Ground (HAG) Menu” in the
Receiver section).
Center of
Display
Front of
Receiver
Place Marker
Straight Down
on Ground
Plumb Line or
Vertical Axis
Replace image