
User's Manual
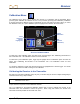
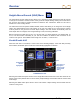
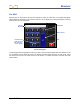
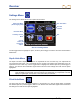
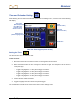

Table Of Contents
- Safety Precautions and Warnings
- Dear Customer:
- Introduction
- F Series Battery Charger System
- Receiver
- General Description
- Standard Receiver Display Screen Symbols
- /Power On
- Power Off
- Automatic Shutdown
- Toggle & Trigger Switches
- Audible Tones
- Main Menu
- /Calibration Menu
- /Height-Above-Ground (HAG) Menu
- /Settings Menu
- Transmitter Selection Menu
- /DigiTrak LWD (Log While Drilling) Menus
- Target Steering Menu
- Using the Keypad
- Display Screens
- Transmitter
- Remote Display
- Locating
- The Target Steering Function
- Appendix A: System Specifications and Maintenance Requirements
- Appendix B: Projected Depth Versus Actual Depth and the Fore/Aft Offset
- Appendix C: Calculating Depth Based on Distance Between FLP and RLP
- Appendix D: Reference Tables
- Appendix E: EU Required Documentation
- LIMITED WARRANTY

Receiver
DigiTrak
®
F5
®
Operator’s Manual 29
Time and Calendar Setting
After selecting the “Set Time and Calendar” option from the settings menu, a screen such as the following
will display.
Date and Time Keypad (Clock Active)
Setting the Time
The time function runs on a 24 hour clock.
To Set the Time:
1. Ensure that the clock is the active function on the keypad as shown above.
2. Select the desired value for time one digit at a time left to right. For example to set the clock to
14:39 (2:39 pm):
- Toggle to highlight the “1” then pull the trigger to select it.
- Toggle to highlight the “4” then pull the trigger to select it.
- Toggle to highlight the “3” then pull the trigger to select it.
- Toggle to highlight the “9” then pull the trigger to select it.
3. Confirm the time reads as desired.
4. Toggle to highlight the return arrow and pull the trigger.
The confirmation tone will sound as the screen returns to the settings menu.
Return Arrow
(Shown Highlighted)
Time Value
(Date Displays
Here When the
Calendar is the
Active Function)
Clock
(Shown Active)
Calendar
(Shown Inactive)
Exit Button