
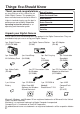
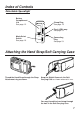
Instruction manual


9
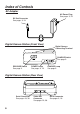
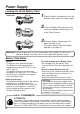
Power Supply
Charging the Battery Pack
Install the Battery Pack (see page 8.)
Charge the Battery Pack fully before operation.
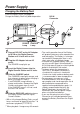
1
Connect DC OUT on the AC Adaptor
to DC IN on the Digital Camera
Station until it locks with a click.
2
Plug the AC Adaptor into an AC
outlet.
The POWER Lamp lights up.
3
Insert the Digital Camera into the
Digital Camera Station until it locks.
4
Slide the CHARGE switch.
The CHARGE Lamp lights orange, and
then changes to green when charging is
done (just under 2.5 hours).
• A red CHARGE Lamp indicates a
charge malfunction. Remove the Digital
Camera and repeat steps 3 and 4.
If the CHARGE Lamp is still red, send
the unit in for service.
5
Slide the RELEASE switch to release
the Digital Camera from the Digital
Camera Station.
• With a fully charged Battery Pack, you will
have a maximum of about 50 minutes*
1
of
continuous playback(77°F/25°C).
*
1
When playback 1 image every 60 seconds.
POWER
Lamp
CHARGE
Lamp
1
3
2
4
5
DC IN
Connector
• The useful operation time of the Battery
will gradually decrease after repeated use
and recharging. The Battery is no longer
serviceable if the operation time is very
short, even after a sufficient charge.
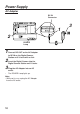
• Instead of the supplied Battery Pack, you
can also use AA type Lithium batteries*
2
,
Ni-Cd (high density type) or nickel-hydride
batteries available on the market.
*
2
In places where the temperature is
50°F(10°C) and below, the battery's
characteristic use time is shortened.
A exclusive nickel-cadmium battery pack
is recommended in lower temperatures.
• For emergency use you can install
2 alkaline batteries. But, due to power
consumption and shorter operation life of
alkaline batteries compared to the
supplied rechargeable battery pack, it is
strongly recommended that only the
Optical Viewfinder (turn off the LCD
Viewfinder) be used to capture images
when using alkaline batteries.
• If you are not going to use the Digital
Camera for an extended period of time,
remove the Battery Pack from the Digital
Camera.