
User guide


LIVEMIX MIX-16/32
6
SETUP AND OPERATION
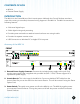
Although the MIX-16 is the Central Mixer of the Livemix
system, there are no direct controls. Setting up the MIX-16
is simple and all conguration is done through an attached
Control Surface (covered in the CS-DUO manual).
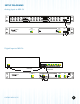
1. If using the analog input, connect the Livemix Data Out
port on the AD-24 to the Livemix Data In port on the
MIX-16. Please use shielded CAT5 or CAT6 cable to
make this connection. If using an option card, you will
not use the Livemix Data In port.
2. Connect each Control Surface to a Control Port on
the front of the MIX-16. These do not have to be
sequential.
3. Connect the Power Supply on the back of the MIX-16 to
an appropriate power source.
4. Turn on the MIX-16.
NOTE:
The audio data sent over the
Livemix system is a proprietary
data format. It will not work with
a switch or a standard Ethernet
network. When using an Option
Card designed for networked
audio use, such as the LM-
DANTE-EXP, consult the Option
Card manual for information on
how to connect to the network.
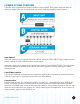
USING THE USB OUTPUT
The MIX-16 is equipped with a USB port for connection to a
computer. When connected, the MIX-16 will show up on the
computer as a USB audio class device. When used with recording
software, the stereo output of any single CS-DUO can be
recorded.
All conguration for this feature is performed on an attached
Control Surface.
• Select a CS-DUO mix to assign to the USB Port and select
the Mix Tools menu on that mix
• Press Global Setup
• Press the MIX-16-/32 USB Mix Assign button
• You will see a message that says “Send your mix to the MIX-16
USB record port?” Press “Yes” to assign or “No” to cancel
The stereo mix from that CS-DUO will now be sent to the USB port
of the MIX-16. Connect to a Windows PC or Apple OS X computer
and record the stereo signal into the audio recording software of
choice.
NOTE:
Networking cable comes in
a variety of “avors”. For the
purposes of Livemix, either CAT5e
or CAT6 cabling is appropriate.