
User Guide
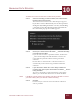
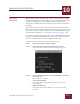
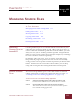
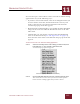
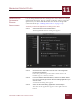
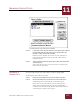

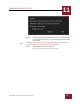
Table Of Contents
- Contents
- Chapter 1 What Is ImageAXS™?
- Chapter 2 Getting Started
- Chapter 3 Viewing Collections
- Chapter 4 Viewing Records and Source Files
- Chapter 5 Creating and Adding to a Collection
- Chapter 6 Entering Field Data
- Chapter 7 Using Keywords to Describe Files
- Chapter 8 Creating Portfolios Within Collections
- Chapter 9 Searching and Sorting Collections
- Chapter 10 Managing Data Records
- Chapter 11 Managing Source Files
- Chapter 12 Exporting Data to Other Formats
- Chapter 13 Slide Shows
- Chapter 14 Printing
- Chapter 15 Scripting and Recording
- What Is ImageAXS™?
- Getting Started
- Viewing Collections
- Viewing Records and Source Files
- Creating and Adding to a Collection
- Creating a New Collection
- Overview: Adding Files to a Collection
- Acquiring Individual Files
- Acquiring All Files in a Folder
- Acquiring From Removable Media
- Acquiring From Digital Cameras or Scanners
- Acquiring From a Video Source
- Acquiring From an Audio Source
- Acquiring From Adobe Photoshop
- Changing Options for Acquiring Files
- Entering Field Data
- Using Keywords to Describe Files
- Creating Portfolios Within Collections
- Searching and Sorting Collections
- Managing Data Records
- Managing Source Files
- Exporting Data to Other Formats
- Slide Shows
- Printing
- Scripting and Recording

MANAGING SOURCE FILES
11
11-5
IMAGEAXS 4.0 MACINTOSH USER’S GUIDE
File dialog box for Copy Source Files command
STEP 3 If you want to use the new location of the copied source files in
the selected data records, click to put a check mark in the
Update Location in Records checkbox.
If this box is not checked, the records in your collection or
portfolio will continue to refer to the source files in their
original location.
STEP 4 Select a folder to hold the copied source files and click Select
“(Folder Name)”.
The source file for each record you selected is copied to the
folder that you identified.
RENAMING A
S
OURCE FILE
You can only rename one source file at a time in ImageAXS.
To rename the source file for a record:
STEP 1 Select the record whose source file you want to rename.
STEP 2 Choose Rename Source File from the Source File menu.
A file dialog box for renaming the source file appears.
If you have a Power Macintosh, you can also open this
dialog box by holding down the CTRL key and clicking a
selected record, then choosing Rename Source File from the
contextual pop-up menu that appears.