
User Guide
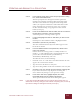
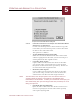
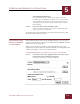
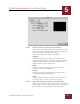
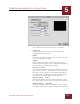
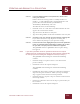
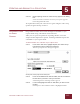
Table Of Contents
- Contents
- Chapter 1 What Is ImageAXS™?
- Chapter 2 Getting Started
- Chapter 3 Viewing Collections
- Chapter 4 Viewing Records and Source Files
- Chapter 5 Creating and Adding to a Collection
- Chapter 6 Entering Field Data
- Chapter 7 Using Keywords to Describe Files
- Chapter 8 Creating Portfolios Within Collections
- Chapter 9 Searching and Sorting Collections
- Chapter 10 Managing Data Records
- Chapter 11 Managing Source Files
- Chapter 12 Exporting Data to Other Formats
- Chapter 13 Slide Shows
- Chapter 14 Printing
- Chapter 15 Scripting and Recording
- What Is ImageAXS™?
- Getting Started
- Viewing Collections
- Viewing Records and Source Files
- Creating and Adding to a Collection
- Creating a New Collection
- Overview: Adding Files to a Collection
- Acquiring Individual Files
- Acquiring All Files in a Folder
- Acquiring From Removable Media
- Acquiring From Digital Cameras or Scanners
- Acquiring From a Video Source
- Acquiring From an Audio Source
- Acquiring From Adobe Photoshop
- Changing Options for Acquiring Files
- Entering Field Data
- Using Keywords to Describe Files
- Creating Portfolios Within Collections
- Searching and Sorting Collections
- Managing Data Records
- Managing Source Files
- Exporting Data to Other Formats
- Slide Shows
- Printing
- Scripting and Recording

CREATING AND ADDING TO A COLLECTION
5
5-11
IMAGEAXS 4.0 MACINTOSH USER’S GUIDE
Source panel, QuickTime Video settings dialog box
STEP 4 Adjust the Source settings for your video device.
If the Source panel of the dialog box is not displayed, click
the pop-up menu in the upper left corner of the dialog box
and select Source from the list that appears.
The options in the Source panel are as follows:
• Digitizer
Click the pop-up menu to display a list of choices that
reflect the video hardware installed on your Macintosh (for
example, built-in digitizers, third-party NuBus or PCI
digitizer boards, or external devices).
• Input
Click the pop-up menu to display a list of choices (for
example, Composite and S-Video).
• Format
Click the pop-up menu to display a list of choices (for
example, NTSC, PAL, and SECAM).
• Filter
Select either TV, LaserDisc or VCR to reflect the source of
the video frames or movies you will be capturing.
STEP 5 Adjust the Compression settings for your video device.
If the Compression panel of the dialog box is not displayed,
click the pop-up menu in the upper left corner of the dialog
box and select Compression from the list that appears.