
User Guide
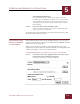
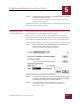
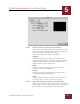
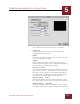
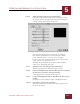
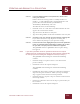
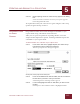
Table Of Contents
- Contents
- Chapter 1 What Is ImageAXS™?
- Chapter 2 Getting Started
- Chapter 3 Viewing Collections
- Chapter 4 Viewing Records and Source Files
- Chapter 5 Creating and Adding to a Collection
- Chapter 6 Entering Field Data
- Chapter 7 Using Keywords to Describe Files
- Chapter 8 Creating Portfolios Within Collections
- Chapter 9 Searching and Sorting Collections
- Chapter 10 Managing Data Records
- Chapter 11 Managing Source Files
- Chapter 12 Exporting Data to Other Formats
- Chapter 13 Slide Shows
- Chapter 14 Printing
- Chapter 15 Scripting and Recording
- What Is ImageAXS™?
- Getting Started
- Viewing Collections
- Viewing Records and Source Files
- Creating and Adding to a Collection
- Creating a New Collection
- Overview: Adding Files to a Collection
- Acquiring Individual Files
- Acquiring All Files in a Folder
- Acquiring From Removable Media
- Acquiring From Digital Cameras or Scanners
- Acquiring From a Video Source
- Acquiring From an Audio Source
- Acquiring From Adobe Photoshop
- Changing Options for Acquiring Files
- Entering Field Data
- Using Keywords to Describe Files
- Creating Portfolios Within Collections
- Searching and Sorting Collections
- Managing Data Records
- Managing Source Files
- Exporting Data to Other Formats
- Slide Shows
- Printing
- Scripting and Recording

CREATING AND ADDING TO A COLLECTION
5
5-6
IMAGEAXS 4.0 MACINTOSH USER’S GUIDE
STEP 2 In the Acquire pop-up menu of the Set Up Input Device dialog
box, select Removable Media.
The Set Up Input Device dialog box contains options for
naming and saving files transferred from removable media.
You must select a folder for saving files before ImageAXS
will let you acquire new files from a removable disk or other
media, although you can choose in a later step to acquire
the files without moving or copying them to the selected
folder (see Step 8).
STEP 3 In the section labeled Save Files in Folder, click Set to select the
location where you want to save your new files.
A file dialog box for selecting a folder appears.
S
TEP 4 Locate and highlight the folder or disk where you want to save
the files.
Click Open to show all folders inside a highlighted folder.
STEP 5 Click Select "(the name of your folder)".
The name and Finder hierarchy for the folder appear to the
left of the Set button.
STEP 6 In the box labeled Names for Acquired Files, decide how to
name your new files.
Names consist of a stem (a prefix or a suffix) attached to a
number — a stem of TestPics and a starting number of 1 will
produce files named TestPics001 (or 001TestPics),
TestPics002 (or 002TestPics), and so on.
To define file names, do the following:
• Click 001<stem> or <stem>001 to determine whether the stem
appears after or before the number.
• Type the stem in the Stem text entry box.
• Type the starting number in the Start At Number text entry box.
STEP 7 Click OK to save your settings for this method of acquiring files.
If you click Cancel, the Set Up Input Device dialog box
closes without any changes to your previous settings.
STEP 8 In the Source File menu, highlight Acquire, then select
Removable Media from the submenu that appears..
The Acquire From Removable Media dialog box appears.
NOTE
If you select Removable Media from the Acquire submenu but have not
defined the necessary settings for this method of acquiring files, the Set Up
Input Device dialog box will appear instead (see Step 1).