
User Guide
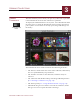

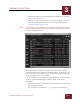
Table Of Contents
- Contents
- Chapter 1 What Is ImageAXS™?
- Chapter 2 Getting Started
- Chapter 3 Viewing Collections
- Chapter 4 Viewing Records and Source Files
- Chapter 5 Creating and Adding to a Collection
- Chapter 6 Entering Field Data
- Chapter 7 Using Keywords to Describe Files
- Chapter 8 Creating Portfolios Within Collections
- Chapter 9 Searching and Sorting Collections
- Chapter 10 Managing Data Records
- Chapter 11 Managing Source Files
- Chapter 12 Exporting Data to Other Formats
- Chapter 13 Slide Shows
- Chapter 14 Printing
- Chapter 15 Scripting and Recording
- What Is ImageAXS™?
- Getting Started
- Viewing Collections
- Viewing Records and Source Files
- Creating and Adding to a Collection
- Creating a New Collection
- Overview: Adding Files to a Collection
- Acquiring Individual Files
- Acquiring All Files in a Folder
- Acquiring From Removable Media
- Acquiring From Digital Cameras or Scanners
- Acquiring From a Video Source
- Acquiring From an Audio Source
- Acquiring From Adobe Photoshop
- Changing Options for Acquiring Files
- Entering Field Data
- Using Keywords to Describe Files
- Creating Portfolios Within Collections
- Searching and Sorting Collections
- Managing Data Records
- Managing Source Files
- Exporting Data to Other Formats
- Slide Shows
- Printing
- Scripting and Recording

VIEWING COLLECTIONS
3
3-11
IMAGEAXS 4.0 MACINTOSH USER’S GUIDE
STEP 2 Click OK if you are finished making changes in the Preferences
dialog box.
The thumbnail images will be displayed at the size you
selected.
NOTE
If you have a Power Macintosh, you can also change the display size by
holding down the CTRL key as you click a thumbnail image in the Thumbnails
View, then selecting an option (Small Thumbnails, Medium Thumbnails, or
Large Thumbnails) from the contextual menu that appears.
To change the display quality of thumbnail images in the Thumbnails View:
STEP 1 Type a number from 1 to 100 in the Compression/Quality % box,
then click OK.
High numbers result in better display quality for thumbnail
images, while low numbers result in more compressed
images and a smaller file size for your collection.
S
TEP 2 Click OK if you are finished making changes in the Preferences
dialog box.
To increase the display size of small thumbnails:
STEP 1 Click to put a check mark in the Scale Up Small Images
checkbox.
STEP 2 Click OK if you are finished making changes in the Preferences
dialog box.
Any thumbnail image smaller than the display size you
have selected (see above) will be scaled up to fill the
available thumbnail image area.
If you do not check the Scale Up Small Images box , the thumbnails
ImageAXS creates when you acquire or update small image files will
be no larger than the actual size of the source file.
CHANGING THUMBNAIL IMAGE ORIENTATION
In some cases, thumbnails created from image source files may
appear sideways or upside down (for example, if a digital camera
was turned sideways when a picture was taken).
Use the Orientation submenu in the Record menu to rotate
thumbnail images by 90, 180, or 270 degrees.
N
OTE
Changing the orientation of a thumbnail image does not affect the source file
in any way. The Source File View display for the image, however, will reflect
the changed orientation.