
User Guide
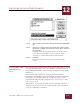

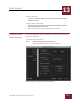
Table Of Contents
- Contents
- Chapter 1 What Is ImageAXS™?
- Chapter 2 Getting Started
- Chapter 3 Viewing Collections
- Chapter 4 Viewing Records and Source Files
- Chapter 5 Creating and Adding to a Collection
- Chapter 6 Entering Field Data
- Chapter 7 Using Keywords to Describe Files
- Chapter 8 Creating Portfolios Within Collections
- Chapter 9 Searching and Sorting Collections
- Chapter 10 Managing Data Records
- Chapter 11 Managing Source Files
- Chapter 12 Exporting Data to Other Formats
- Chapter 13 Slide Shows
- Chapter 14 Printing
- Chapter 15 Scripting and Recording
- What Is ImageAXS™?
- Getting Started
- Viewing Collections
- Viewing Records and Source Files
- Creating and Adding to a Collection
- Creating a New Collection
- Overview: Adding Files to a Collection
- Acquiring Individual Files
- Acquiring All Files in a Folder
- Acquiring From Removable Media
- Acquiring From Digital Cameras or Scanners
- Acquiring From a Video Source
- Acquiring From an Audio Source
- Acquiring From Adobe Photoshop
- Changing Options for Acquiring Files
- Entering Field Data
- Using Keywords to Describe Files
- Creating Portfolios Within Collections
- Searching and Sorting Collections
- Managing Data Records
- Managing Source Files
- Exporting Data to Other Formats
- Slide Shows
- Printing
- Scripting and Recording

PRINTING
14
14-2
IMAGEAXS 4.0 MACINTOSH USER’S GUIDE
In any view, you can change the relative width or height of your
print output (for example, to change the arrangement of printed
thumbnails, or to fit a wide Source File View image onto a single
page) by changing the Orientation setting in the Page Setup dialog
box. In addition, you can fit more material on each page by reducing
the number in the Scale text entry box of the Page Setup dialog box
below 100 percent.
HEADER/FOOTER OPTIONS
To set page header and footer options for printing from ImageAXS,
select Page Setup from the File menu, then choose ImageAXS from
the menu in the upper left corner of the Page Setup dialog box.
The page setup options are as follows:
• To have a centered title appear at the top of each page, click to
put a check mark in the Header checkbox, then type the header
text you want in the text entry box to the right.
• To have centered footer text appear at the bottom of each page,
click to put a check mark in the Footer checkbox, then type the
footer text you want in the text entry box to the right.
• To have a page number appear in the lower right corner of each
page, click to put a check mark in the Page Number checkbox.
• To have the current date appear in the lower left corner of each
page, click to put a check mark in the Date checkbox.