
User's Manual


VuLink Operation & Installation Guide 860‐00198‐00 REV E
DigitalAlly,Inc.|BeforeyouBegin 1‐1
Section‐1: BeforeyouBegin
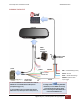
Overview of Features
Automatically start recordings on your Firstvu HD™ using the same triggers as vehicle
video systems, regardless of whether the unit is mounted or worn.
Simultaneously start recordings with your vehicle video system, whether started
manually on either system or automatically triggered.
Eliminate distraction and the need to continuously record or remember to press record.
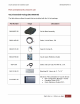
Installation Tools Needed
Wire Strippers
Tools to remove vehicle trim
Wire Crimpers
Digital Volt Meter
Cautions and Notes
Please read and follow the instructions and precautions in this installation guide when installing
VuLink.
For assistance, a qualified installation technician or mechanic should be consulted.
To prevent electrical shorts or breakage in the wiring and cabling, do not allow wiring and
cabling to be pinched behind trim pieces, panels, or other physical objects.
Do not run wires or cables in areas where they may become damaged by heat from the
engine or the exhaust system.
Do not install any wiring in the deployment path of any air bags.
When installing the cables or making wire connections, it is recommended you leave a little
‘slack’ in the cable connections to allow for service loops so the connections do not get
pulled or accidentally disconnected.
We recommend at least 2 feet of distance between VuLink and that of other systems which
may carry a signal for transmit and/or receive.
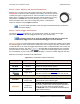
Specifications
OPERATINGVOLTAGE 8‐30VDC
CURRENTDRAW 250mAMaximum
MAXTRANSMITPOWER 10dBm
TRANSMITRANGE 50fttypical
WEIGHT 55.4g(0.12lbs.)
OPERATINGTEMPERATURE‐30°to+60
°
C
STORAGETEMPERATURE ‐40°to+80° C
DIMENSIONS 23mm(0.9in.)(D)x91mm(3.6in.)(W)x61mm(2.4in.)(H)