
User's Manual

MicroVu HD™ Operation Guide 860-00222-00 Rev A
Digital Ally, Inc. | Uploading Files
4-6
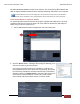
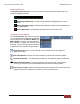
3. Once the files have been verified, the system will automatically list and select all of the
files for upload. If you don’t wish to upload all available records, uncheck the Select All
checkbox and then check the box next to each record you want to upload. The default File
Server and Share Location are displayed. If additional file servers have been defined,
select the desired destination using the dropdown menu. Click the Upload Files button to
begin uploading data to the system.
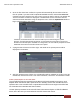
If desired, the selected files can also be backed up to a DVD during the upload
process. VuVault supports disc spanning, so if the total size of the files in the source
location exceeds the space available on a single disc, the user will be prompted to insert
additional discs until all of the files have been copied.
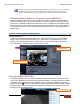
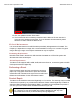
4. A progress bar will move from left to right, and details of the upload process will be
displayed in the window.
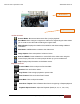
5. After the upload process finishes, the uploaded files will be available for viewing in the My
Dashboard, and Search screens. For more information, consult the VuVault User’s Guide.
Video Upload Option 3: microSD Card
The microSD Card can be removed from the MicroVu HD and inserted into a memory card
adapter. When the MicroVu HD is powered off or in standby, remove the microSD Card and
replace it with a new microSD Card, or upload the event files from the original microSD Card
into VuVault and re-install the card when finished.
VuVault Upload procedure for the microSD Card is the same as Option 2: USB Port Method
above, but in this case you must select the microSD Card as the Source.