
User Guide


CHAPTER 2 OPERATION
CHAPTER 3 SETTINGS
To power ON the body camera, press and hold the Power button
for 3 seconds. The body camera will vibrate and the Digital Ally
logo will appear on the display. Once fully booted, the image from
the camera will be displayed followed by an audible beep.
To power OFF the body camera, press and hold the Power button
for 3 seconds. The body camera will produce two audible beeps
DQGSRZHUR
2.1 POWER-ON/OFF
7KHVFUHHQVDYHUZLOOWXUQ2))WKHGLVSOD\DIWHUWKHFRQȴJXUHG
time with no operation. Pressing any button will wake the display.
7KHFRQȴJXUDWLRQRSWLRQVDUHVVPLQPLQ
2.2 DISPLAY SCREENSAVER
CHAPTER 4 NETWORK
After the body camera starts up, it enters into the preview mode
automatically.
2.3 STANDBY
Press and hold the Audio button to begin an Audio recording.
The body camera will produce an audible beep, followed by the
Yellow Status LED blinking in sync with the Record icon on the display.
Press the Audio button again to stop the recording.
The body camera will produce two audible beeps.
2.7 AUDIO RECORDING
7KHSKRWRUHVROXWLRQFDQEHFRQȴJXUHGWKURXJKWKH
Menu>General>Preference>Photo Res.
Options include 40MP, 36MP, 20MP, 16MP, 12MP, 9MP, with 16MP
as the default.
3.4.1 RESOLUTION
7KHEXUVWPRGHFDQEHFRQȴJXUHGWKURXJKWKH
Menu>General>Preference>Burst Mode.
2SWLRQVLQFOXGH2Q2ZLWK2QDVWKHGHIDXOW
3.4.2 BURST MODE
4.2 WI-FI
:L)LFRQQHFWLYLW\RSWLRQVFDQEHFRQȴJXUHGWKURXJKWKH
Menu > General > Wireless > WLAN
4.3 STREAMING PARAMETERS
6WUHDPLQJ3DUDPHWHUVFDQEHFRQȴJXUHGWKURXJKWKH
Menu>General>System>Stream Parameters
Cellular connectivity requires the use of a SIM card and an active
service plan.
4.1 CELLULAR NETWORK
7KHYLGHRUHVROXWLRQFDQEHFRQȴJXUHGWKURXJKWKH
Menu >General>Preference>Video Res.
Options include 1920*1080, 1280*720, 848*480, with 1280*720
as the default.
3.1.1 RESOLUTION
3.1 VIDEO SETTINGS
3.4 PHOTO SETTINGS
7KHYLGHRIUDPHUDWHFDQEHFRQȴJXUHGWKURXJK
Menu >General>Preference>FPS.
Options include 25fps, 30fps, with 30fps as the default.
3.1.2 FRAME RATE
7KHYLGHRELWUDWHFDQEHFRQȴJXUHGWKURXJKWKH
Menu >General>Preference>Video Bitrate.
Options include High, Standard, Low, with Standard as the default.
3.1.3 BITRATE
7KHSUHHYHQWWLPHFDQEHFRQȴJXUHGWKURXJKWKH
Menu >General>Preference>Pre-Event.
2SWLRQVLQFOXGH6662ZLWK2DVWKHGHIDXOW
7KLVRSWLRQDGGVWKHFRQȴJXUHGSUHHYHQWWLPHWRWKHEHJLQQLQJRI
the video.
3.2 PRE EVENT
7KHSRVWHYHQWWLPHFDQEHFRQȴJXUHGWKURXJKWKH
Menu >General>Preference>Post-Event.
2SWLRQVLQFOXGH66662ZLWK2DVWKHGHIDXOW
7KLVRSWLRQDGGVWKHFRQȴJXUHGSRVWHYHQWWLPHWRWKHHQGRI
the video.
3.3 POST EVENT
Press the Menu Button to access the Main Menu.
Press the Playback icon on the display.
Press the Photo, Audio, or Video icon to access the recorded media.
2.8 PLAYBACK
MENU
BUTTON
GENERAL
FROM
MENU PAGE
WIRELESS
THRU
GENERAL PAGE
SELECT SSID
AND ENTER
PASSWORD
WLAN
MENU
BUTTON
STREAM
PARAMETERS
SYSTEM
GENERAL
FROM
MENU PAGE
MENU
BUTTON
SELECT &
VIEW MESSAGES
FUNCTIONS
FROM
MENU PAGE
NOTIFICATION
FROM
FUNCTIONS
PAGE
4.4 NOTIFICATION
Review messages from evo.vuvualt.com through
0HQX!)XQFWLRQ!1RWLȴFDWLRQ
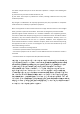
4.5 GPS
With GPS enabled and locked, coordinates will be logged once per
second during recording. Enable this feature through the
Menu > General > Preference > GPS
MENU
BUTTON
GENERAL
FROM
MENU PAGE
ENABLE OR
DISABLE
GPS
PREFERENCE
THRU
GENERAL PAGE
Press the Menu button to access the Playback, Functions, and
General options from the Main Menu.
2.4 MENU
Press the Snapshot button to take a still photo while in Standby or
while recording a video – a camera shutter sound will be produced.
2.5 SNAPSHOT
Press the Video button to begin a recording.
The body camera will produce an audible beep, followed by the
Red Status LED blinking in sync with the Record icon on the display.
The Mark button can be pressed during the recording to tag the
video as important.
Press the Video button again to stop the recording.
The body camera will produce two audible beeps.
2.6 VIDEO RECORDING
FULL-FEATURED BODY-WORN CAMERA | QUICK START GUIDE