
User guide

96
Return Inventories
Return Inventories are ways to account for products returned to a Supplier. They are basically the opposite
of Receiving Inventories. These typically match up to credit invoices from your Supplier.
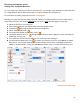
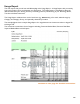
Items entered into Return Inventories will show up as negative amounts in the Received column of a Usage
Report.
For example, if you receive a case of Absolut and return two bottles of Absolut the Receiving quantity in
your Usage Report will be 12-2=10. If you return a case of Absolut and receive none, the receiving quantity
in your Usage Report will be -12.
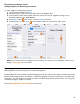
To create a Return Inventory:
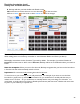
1. Press Inventories on the Main Screen then go to the Inventories screen.
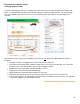
2. Next, press the
icon
on the bottom toolbar on the Inventories screen to create a new
Inventory.
3. On the Create Inventory screen, choose Return Inventory.
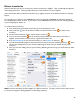
4. You can set various details for the Inventory like the Date/Time the Inventory was taken, a
Supplier invoice number, invoice amount, a general description, etc.
5. Press Start Inventory to save the new Inventory or select Cancel to discard it.
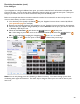
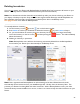
6. You will automatically navigate to the Search Items screen for the new Receiving Inventory. Here
you can start adding Items to your Inventory following the same steps you would with any other
Inventory.
7. Here you can start adding Items to your Inventory following the same steps you would with any other
Inventory.
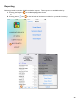
Note: You have the option to add a Supplier to a Return Inventory. The steps are the same as those shown
on the previous page for adding Suppliers to a Receiving Inventory.