
User guide


88
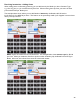
Receiving Inventories (cont.)
To create a Receiving Inventory:
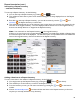
1. Press Inventories on the Main Screen then go to the Inventories screen.
2. Next, press the
icon
on the bottom toolbar on the Inventories screen to create a new
Inventory.
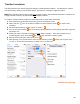
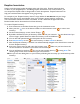
3. On the Create Inventory screen, choose “Receive.”
4. By default, the Date/Time for the Inventory will be the time you created it.
a. You can select Edit if you wish to assign a specific Date/Time when the delivery occurred.
b. If you are creating a Receiving Inventory much later, say the day after a delivery, we
recommend editing the Date/Time to assure future Reports will be accurate.
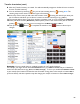
5. You can add details such as the invoice amount, invoice number and Supplier to a Receiving Inventory.
6. You can also add optional notes and descriptions for the Inventory.
7. Press
Start Inventory to save
the new Inventory or select Cancel to discard it.
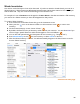
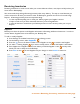
8. After the Receiving Inventory is created. You will automatically navigate to the Search Items screen
for the new Receiving Inventory.
9. Here you can start adding Items to your Inventory following the same steps you would with any other
Inventory.
continue to next page