
User guide


83
Transfer Inventories (cont.)
8. After the Transfer Inventory is created. You will automatically navigate to the Search Items screen for
the new Transfer Inventory.
9. You can add Items by searching. Or you can start scanning Items by pressing Scan. The
scanning steps are the same as with other types of Inventories.
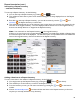
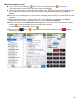
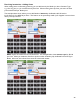
10. At the top of the screen you will notice the Location menu. Pressing the menu drops down your
list of Locations and allows you to select a Location to transfer the Item(s) to (e.g., Bar 1).
11. The example below shows a search for the Items containing “bud” as you are looking for Budweiser.
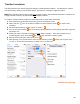
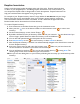
12. When you select the Item (Budweiser), Barkeep takes you to a new screen where you can add the
quantity of bottles (or cases) you are moving from the Walk-in Cooler to Bar 1.
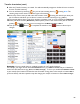
13. Then press the
button
to complete the transfer or the
button to discard your
changes.
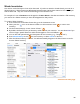
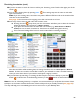
Reminder: You can transfer Items to multiple Locations in one Transfer Inventory.
For example, you might remove 24 bottles Budweiser from your Walk-in Cooler and put 12 bottles in
each of two bar station areas (e.g., Bar 1 and Patio Lounge). To do so you would select Walk-in Cooler
as your transfer from Location and then first add 12 bottles moving them to the transfer to Location Bar 1
(as shown above), and then repeat the step but change your transfer to Location to show Patio Lounge.