
User guide


44
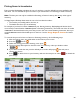
Adding Items to Inventories (cont.)
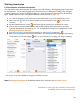
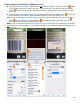
1. After choosing an Item, you will be taken to the Inventory Item screen.
2. Enter a quantity and press the
button.
Notice that the product you are adding and the Location that the product will be added to are
displayed at the top of the screen.
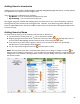
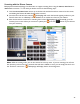
3. Once you’ve entered a quantity and pressed the
button, BarkeepApp will add the Item to your
Inventory with the specified quantity at the chosen Location and return you to the Items list.
4. Repeat this until you have added all of your Items to the current Location.
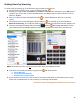
5. When you are finished adding Items to the first Location in your Inventory, you can then move onto
the next Location. When you add the first Item in a different Location go to the top of the screen
and use the drop down menu to change the Location for the Item you are adding to the Inventory.
Also, if you continue adding more Items to the Inventory, the Items will be added to your newly
selected Location until you change to a different Location. (see previous page)