
User guide


43
Adding Items to Inventories
Adding an Item to an Inventory in BarkeepApp is essentially telling BarkeepApp that there is a certain quantity
of a specific Item in a specific Location at a given time.
There are two ways to add Items to an Inventory:
• By Name – You can scroll/search and add Items by name
• By Scanning – You can scan the Item’s barcode
We suggest trying both methods and deciding which one works best for you. We’ve found that, in general,
entering Items by name is faster than scanning barcodes. However, if you have a large wine collection and
there are subtle differences in the name of different wines, then you may find that scanning the bottles is best
to insure accuracy.
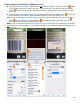
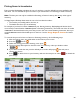
Adding Items by Name
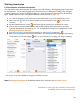
To enter Items by name, go to the Inventory that you want to add Items to.
1. On the Inventory screen, press the
icon
on the bottom toolbar.
2. Begin by typing the Item name in the search box at the top of the screen. Typically within two or
three characters BarkeepApp will narrow the list down to the Item(s) that you want.
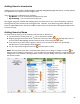
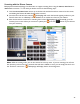
3. If the Item that you want doesn’t appear in the List, you can choose to add it now by selecting:
Add New Item or Search Barkeep’s Online Database
4. Or you may scroll through the Items List and select Items to add.
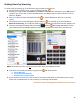
Note: The top of the screen has a drop down menu where you can assign or change a Location for
the Item you are adding to the Inventory. You can add Items to multiple Locations in a single Inventory by
adding Items to one Location, selecting another Location, and then adding more Items to the Inventory at
the second Location.