
User guide


42
Starting Inventories
Full Inventories and other Inventories
The instructions below show examples for creating a new Full Inventory. The beginning steps are the same
for all Inventories. On the following pages there are instructions for adding Items, adding cases, changing
Locations, editing your Inventory, weighing bottles, etc. These instructions are the same for all Inventory
types. Specific instructions for other types of Barkeep Inventories start on page 79.
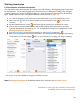
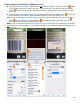
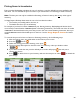
1. To create an Inventory, press Inventories on the Main Screen to go to the Inventories screen. *
2. Next, press the
icon
on the bottom toolbar on the Inventories screen to create a new
Inventory.
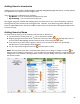
3. On the Create Inventory screen, choose the type of Inventory you would like to create.
4. You can also set various details for the Inventory like the Date/Time the Inventory was taken,
a general description of the Inventory, etc. For an explanation of each of these properties, see the
Editing Inventories Section.
5. Press
Start Inventory to save the new Inventory or select Cancel to discard it.
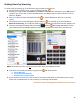
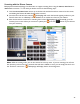
6. After you have saved and started the new Inventory you will automatically navigate to the Inventory
screen where you can start adding Items to your Inventory by scrolling, searching or scanning.
* See page 70 for more details on using your Inventories screen.
Note: The Support Section on the Barkeep website has a document with Inventory Tips.
continue to next page for detailed instructions
on adding Items to your Inventory