Welcome to Barkeep! User Guide for iPhone Version 4.2 October 2014 *iPad users please refer to the iPad User Guide available at barkeepapp.
Welcome to Barkeep! Table of Contents About Barkeep v4.2 .................................... 4! System Requirements ................................ 5! BarkeepApp ... Error! Bookmark not defined.! Hardware Required ...... Error! Bookmark not defined.! BarkeepOnlineError! Bookmark not defined.! Bluetooth Digital Scale .................................. 6! Getting Started – Settings .......................... 7! Name, Email and Contact .............................
Inventories ................................................. 41! Creating Inventories.................................... 42! Full Inventories and other Inventories ......... 42! Adding Items to Inventories ....................... 43! Adding Items by Name................................ 43! Adding Items by Scanning ......................... 45! Scanning with the iPhone Camera .............. 47! Scanning Tips .............................................. 48! Scanning Items with a Scanner ..................
About Barkeep v4.2 Barkeep is a liquor inventory tracking system designed exclusively for the Apple iPhone, iPod Touch and iPad. Barkeep allows you to track your liquor inventory and usage, determine your Pour Cost, manage Suppliers and liquor orders, and track and analyze sales. To run a successful bar or nightclub, it is extremely important to understand and manage your Pour Cost.
System Requirements BarkeepApp BarkeepApp v4.2 requires iOS version 5.0 or later. Note: If you are using iOS version 8.0 you must upgrade BarkeepApp to version 4.2 – earlier versions of BarkeepApp are not compatible with iOS 8.0 Hardware Required BarkeepApp v4.
System Requirements (cont.) Bluetooth Digital Scale There are only two Bluetooth digital scales that are designed to exclusively work with BarkeepApp: Digitot, Digitag Bluetooth digital scale To use the Digitag Bluetooth digital scale a Linea-Pro scanner with Bluetooth support or an Infinea Tab scanner with Bluetooth support is required. Reflex Bluetooth digital scale The Reflex Bluetooth digital scale does not require an additional scanner.
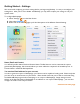
Getting Started – Settings We recommend configuring your basic settings before you begin using Barkeep. It is easy to reconfigure your settings later. After you are more familiar with Barkeep, you may want to adjust your settings to suit your specific needs. To configure BarkeepApp: 1. Select "Settings" from the Main Screen. 2. Next select General. 3. Below and on the following pages you’ll find descriptions of the different General Settings.
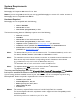
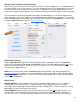
Weight Format and Measurement Settings After entering your Bar Name and contact information you may select a weight format. The default format is to express weight in ounces (e.g., 99.9 oz). You can press Edit and choose to set BarkeepApp for a pounds and ounces format or for a metric format (see below). A Weight Format will be needed when you enter partial bottle weights during inventories. We recommend entering partial bottle weights in ounces if possible.
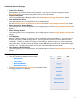
Additional General Settings • • • • • • • Case Price Setting BarkeepApp is set to allow Case Prices by default. You may turn off this setting if you prefer. See page 90 for more about using Case Prices vs. Prices per Bottle. Support Banquets Use to activate Barkeep’s Banquet feature. See the Banquet Settings Section for details. Use Default Item Price This setting allows you to manage data in your Usage Reports. See the Pricing Items in Inventories Section and the Usage Report Section for details.
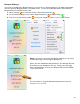
Banquet Settings If you wish to use Barkeep’s Banquet features, you must turn on Support Banquets. By default, BarkeepApp does not show the Banquet feature on the Main Screen. To turn on the Banquet feature and include the Banquet feature in the Main Screen menu: 1. Select "Settings" from the Main Screen. Next select General. 2. On the General Settings screen switch “Support Banquets” to the on setting. 3. Press Save on the bottom toolbar to save your changes or select to Cancel discard them.
Data Storage Your BarkeepApp data is stored locally on your iOS Device. By default your data is stored indefinitely on your Device. To prevent your Device from being filled with older inventories, we recommend you turn on the Auto Delete Inventories option. This will automatically remove Inventories from your iOS Device after 120 days from the Inventory Date. To turn on the Auto Delete feature: 1. Select "Settings" from the Main Screen. Next select BarkeepOnline. 2.
Locations Barkeep is able to track Inventory and usage by multiple Locations. You may set up just one Location or any number of Locations to suit your business. You can use Locations to track Liquor Usage at specific spots within your bar (i.e., individual bartender stations). For example, you can have a single Location named "My Bar," or you can have many Locations like "Storage," "Walk-In Cooler," "Well 1," "Well 2," "Well 3," "Patio Bar," etc.
Adding a new Location To add a new Location: 1. Go to Settings and select “Locations.” 2. Select the icon on the bottom toolbar of the Locations screen. 3. Enter a unique name for your Location and press . 4. Press Save on the bottom toolbar to save your new Location or select Cancel to discard it.
Modifying an Existing Location To rename or modify an existing Location: 1. Go to Settings and select “Locations.” 2. On the Locations screen press the name of the Location that you’d like to change. 3. This will activate the keyboard and take you to that Location’s name field. 4. Edit the Location name and press . 5. Press Save on the bottom toolbar to save your changes or select Cancel to discard them. The example below shows renaming the Location Mezzanine Bar to Bar 2.
Deleting a Location To delete a Location: 1. Go to Settings and select “Locations.” 2. Slide your finger along the Location name and a red button will appear. 3. Press the button. 4. Press Save on the bottom toolbar to save your changes or select Cancel to discard them. Note: If you delete a Location that is used in an existing Inventory, the Items that have been added to the deleted Location will show up with a blank Location name.
Category Groups and Categories Category Groups and Categories are used to organize Items into logical groupings. Items in Barkeep are assigned to a Category, and each Category is assigned to a Category Group. For example, by default, the Item Absolut 1L is assigned to the Category “Call Liquor” which is part of the “Liquor” Category Group. Barkeep has been set up with some basic default Categories and Category Groups (see page 23).
Adding Category Groups To add a new Category Group: 1. Select the icon on the bottom toolbar of the Categories screen. 2. Then select “Add Category Group” from the action menu. 3. Enter a name for the new Category Group in the name field and then press . 4. Press Save on the bottom toolbar to save the new Category Group or select Cancel to discard it.
Adding Categories To add a new Category: 1. Select the icon on the bottom toolbar of the Category screen. 2. Then select “Add Category” from the action menu. 3. Press the name field to activate the keyboard. 4. Enter a name for the new Category in the name field and then press . 5. Choose a Category Group from the picker. A new Category must be added to a Category Group. 6. Press Save on the bottom toolbar to save the selection of the Category Group. 7. You will be taken back to the Categories screen.
Editing Category Groups To edit a Category Group: 1. Go to the Categories screen. Select the Category Group button at the top of the screen – this will filter the list so that it shows only the Category Groups and not Categories. 2. Select the Category Group that you’d like to modify. 3. This will take you to the name text field for that Category Group and activate the keyboard. Here you can modify the Category Group name. . 4. Modify the Category Group as needed in the name text field and then press . 5.
Editing Categories To edit a Category: 1. Go to the Categories screen. Select the Category that you’d like to modify. 2. This will take you to the Edit Category screen for that Category. Press the name text field and activate the keyboard. 3. Modify the Category name as needed in the text field and then press . 4. You also can use the picker if you would like to change the Category Group for the Category. 5. Press Save on the bottom toolbar to save your changes or select Cancel to discard them.
Deleting Category Groups To delete a Category Group: 1. Go to the Category Groups screen. 2. Slide your finger along the Category Group name you would like to delete. 3. A red button will appear. 4. Press Delete to confirm you would like to delete the Category Group or press Cancel to keep it. 5. After you press Delete , you will return to the Category Groups screen. 6. Press Save on the bottom toolbar to confirm your deletion or select Cancel to undo the change.
Deleting Categories To delete a Category: 1. Go to the Categories screen. Slide your finger along the Category name you would like to delete. 2a. A red button will appear. After you select an action menu will appear. Press Yes to confirm you would like to delete the Category or press No keep it. 2b. An alternative method is to press the icon on the bottom toolbar while you are editing a Category. After you press , an action menu will appear.
Default Categories By default, Barkeep creates the following Category Groups and Categories. Category Group Beer Liquor Wine Misc Categories Domestic Bottled Beer Domestic Draft Beer Premium Bottled Beer Premium Draft Beer Ultra Premium Draft Beer Well Liquor Call Liquor Premium Liquor Wine Premium Wine Champagne Misc Red Bull Water / Soda Starting with Barkeep Defaults Because it is easy to change settings later, we recommend that you get started with a fairly simple, basic configuration.
Items Barkeep defines Items as the products that you purchase from distributors and keep in Inventory (e.g., bottles and cases of Absolut Vodka and kegs and cases Budweiser, etc.). Pre-Installed/Default Items BarkeepApp is automatically installed with a set of standard Items that are commonly used in most bars – like Absolut Vodka and Budweiser Beer. We want to keep the number that is installed on your iPhone, iPod Touch or iPad as small as possible.
Adding New Items There are three options for adding new, additional Items to your list that you do not find in the default set: • Searching – Search the Barkeep Server’s database by name and find over 75,000 products you can add to your Items List. • Copying – Make a copy of an existing Item and then modify it. • Manually – If you cannot find the Item(s) in our database, you can manually create a new Item.
Adding New Items by Searching Most users find that the quickest way to add a new Item is by searching the Barkeep Database and adding the new Item. We recommend searching the Barkeep Database before entering a new Item manually. To begin searching, select “Items” to go to the Items screen: 1. Press the search bar at the top of the screen to activate the keyboard. 2. Begin typing the name of the Item you are searching for. 3.
Adding New Items by Searching (cont.) Searching for a more specific Item Some brands have a large family of products, Skyy Vodka is a good example – remember that you will need a separate Item for each individual product, for example, Skyy Vodka, Skyy Cherry, etc. Below is an example of what might happen if you search “Skyy” in Barkeep to add a specific Item to your Items List. For example you want to add Skyy Ginger.
Adding New Items by Searching (cont.) Search Tips Remember that there are over 75,000 products in our system. So there will likely be multiple matches for the word(s) you search on. Below are a few search tips: • • • • • • Be as specific as possible. Typing the entire word will help eliminate unwanted matches. For example, if you are searching for a new flavor of Hangar One Vodka it is better to search for “Hangar” or “Hangar One” than “Han.” Search for unique words.
Adding New Items by Copying an Existing Item Barkeep has a feature where you can copy an existing Item and then modify the copy to create new Item. This feature is especially useful if you need to add a new Item that is very similar to an existing Item, for example, the same Item but in a different size or a new flavor/variety of a popular Item. The instructions below show an example where you create a new Item for Absolut Strawberry. To create a new Item by copying an by copying an existing Item: 1.
Adding New Items by Copying (cont.) 7. Modify the name of the copied Item. In this example it’s changed to Absolut Strawberry. 8. You can make other changes to the new Item’s details, e.g., price, Category, size, etc. 9. Also, if a barcode already exists, remove the old barcode associated with the Item you copied from and add a new, correct one. 10.
Adding New Items Manually Search First Before you choose to add an Item manually, we recommend you search the Barkeep Database first. Below is an example of a search that did not find the Item you would like to add. Select “Ok” choose to Add New Item manually. You will be taken to a blank, new Item Details screen.
Adding New Items Manually (cont.) To add an Item manually: 1. Select “Items” on the Main Screen. 2. On the Items screen, select the icon in the bottom toolbar. 3. You will see a blank, new Item Details screen. Press the name field 4. The Item Details screen allows you to enter the details modify the details of an existing Item. to activate the keyboard. for a new Item that you create manually, or Note: that the Item Details screen SCROLLS down.
Adding New Items Manually (cont.) 5. Selecting a Category for your new Item is another important detail you need to add. See the previous Categories Section for more details. 6. Press the button next to the Category field. 7. An action menu will appear. Using the picker, select a Category (e.g. Premium Liquor). 8. Press to Save your selection. 9.
Adding Barcodes to Items To scan and add a barcode to an existing Item: 1. Select the Item from your Items List. 2. After selecting the Item, you will be taken to the Item Details screen. 3. On the bottom toolbar of the Item screen press Scan to activate your Device’s camera or the Captuvo or Linea-Pro scanner. The scanner will be beep to indicate the barcode has been successfully scanned and added to the Item Details. 4. Barkeep will take you back to the Barcode Details screen.
Adding/Modifying an Item’s Category Once you’ve searched Barkeep’s database and added a new Item, you will need to go in and modify the Item Details to set the Category. This is also required if you have added an Item manually and not yet added a Category. Because you can customize the Category Groups and Categories that are defined in Barkeep, we do not attempt to set a default Category for Items that you added by Searching Barkeep. By default, these Items will show up with a Category of “None.
Adding/Modifying the Container Type Once you’ve added a new Item, you may modify the Item Details to set the Container Type. By default, new Items added from the Barkeep Server will have the correct Container Type (e.g., Bottles, Kegs, etc.). If you manually create a new Item without searching the Barkeep Server, it will have the default Container Type “Bottle.” You can change the Container Type if needed. Note: You may have many products with identical brand names, (e.g.
Item Properties Barkeep defines an Item as any product that you carry in inventory – like Absolut 1L bottles, Stella 15.5 Gal Kegs. The Item’s entry contains general information about the product like its barcode, default price, default case size, container type (bottle • keg • can • each • box • bag • bag in box • carton), full bottle weight, empty bottle weight, etc. Property Nam e Category Barcode Price Size / Units Container Type Supplier Full W t Em pty W t Description The name of the Item.
Finding Items In the Items screen, you can search for Items by typing part of the Item name in the search bar. As you type, the Items List will automatically reduce to show only Items containing the letters typed into the search bar. You can also sort the Items List Alphabetically or By Category using the sort buttons located directly below the search bar. Running Items Report You can generate a report containing your Items list by pressing action icon on the bottom toolbar.
Editing Items To edit an existing Item: 11. You begin by finding the Item as shown on the previous page. 12. Press the Item you wish to edit on the Items List. 13. This will take you to the Item Details screen where you can change the information for the Item. 14. Press to Save the changes or select Cancel to discard them. Note: For detailed instructions for adding Full Bottle Weight and Empty Bottle Weight information to an Item see page 54.
Deleting Items Please read this page before deleting any Items. Warning: If you choose to delete an Item from your Items List, BarkeepApp will remove the Item and all references to that Item. This means that if you have used the Item in an existing Inventory, the Item will be deleted from that Inventory. So please be careful when deleting an Item to avoid unexpectedly altering an existing Inventory. To delete an existing Item: 1. You begin by finding the Item as shown on the previous pages. 2.
Inventories Barkeep allows you to create six different types of Inventories. Full Inventories page 42 Used to track how much of each product you have at a given point in time. Full Inventories can contain data for one or more Locations. You can also start a Full Inventory as a Repeat Inventory, but Barkeep still classifies a Repeat Inventory as a Full Inventory, it’s not a different type. Transfer Inventories Used to track when liquor is moved between Locations.
Starting Inventories Full Inventories and other Inventories The instructions below show examples for creating a new Full Inventory. The beginning steps are the same for all Inventories. On the following pages there are instructions for adding Items, adding cases, changing Locations, editing your Inventory, weighing bottles, etc. These instructions are the same for all Inventory types. Specific instructions for other types of Barkeep Inventories start on page 79. 1.
Adding Items to Inventories Adding an Item to an Inventory in BarkeepApp is essentially telling BarkeepApp that there is a certain quantity of a specific Item in a specific Location at a given time. There are two ways to add Items to an Inventory: • By Name – You can scroll/search and add Items by name • By Scanning – You can scan the Item’s barcode We suggest trying both methods and deciding which one works best for you. We’ve found that, in general, entering Items by name is faster than scanning barcodes.
Adding Items to Inventories (cont.) 1. After choosing an Item, you will be taken to the Inventory Item screen. 2. Enter a quantity and press the button. Notice that the product you are adding and the Location that the product will be added to are displayed at the top of the screen. 3. Once you’ve entered a quantity and pressed the button, BarkeepApp will add the Item to your Inventory with the specified quantity at the chosen Location and return you to the Items list. 4.
Adding Items by Scanning To enter Items by scanning, go to the Inventory that you want to add Items to. 1. On the Inventory screen, press Scan in the bottom toolbar. 2. Pressing Scan will activate the Captuvo or Linea-Pro scanner if one is attached, or your iOS Device’s camera. If you do not have a scanner attached and/or your Device does not have a camera, the Scan feature is disabled. 3. Press Done after you have scanned the barcode or wait for Barkeep to take you to the next screen. 4.
Adding Items to Inventories by Scanning (cont.) 8. If you choose Search Barkeep and the Item is not found, you will see a new pop-up screen where you can make the choice to create a new Item. If you choose Yes, you will see a new Item Details screen that has the barcode, but without other details. Add details to the Item before you select Save . 9. If you choose Create New Item Manually, you will also see a new Item Details screen that has the barcode without other details.
Scanning with the iPhone Camera Barkeep has licensed technology from Red Laser to support scanning Items using the iPhone, iPod Touch or iPad’s built-in cameras. To scan with you built-in camera do the following steps: 1. Hold the iPhone/iPod Touch camera up to the barcode until the barcode is centered on the screen, and holding the Device still while the barcode is scanned. 2.
Scanning with the iPhone Camera (cont.) Scanning Tips Here are some tips on how to effectively use the scanning feature: • Lighting - Using the camera to scan doesn't work well in low-light conditions. So make sure that you have good, even lighting. • Avoid glare - if your lighting is causing a glare on the bottle, it can wash out part of the barcode making it difficult / impossible to scan. • Keep the bottle still. We personally have trouble holding both the bottle and camera still at the same time.
Scanning Items with a Scanner Linea-Pro and Captuvo Scanners You have the option to purchase a Linea Pro or Captuvo laser scanner. The scanners have a cradle containing a magnetic card reader and laser scanner that you slide an iOS Device into (see below for specific devices). Scanners are useful for scanning barcodes on liquor bottles when taking inventory. However, a separate scanner is optional. You can also enter Items into an Inventory by name, so you don't have to scan the barcodes.
Pricing Items in Inventories Every time that BarkeepApp calculates the cost of a product, it uses the default Item price specified at the Item level. You can override the price of an Item as you add the Item to a Receiving or Return Inventory. Note: The Item price can only be modified in a Receiving or Return Inventory but not any other type of Inventory.
Weighing Bottles Adding and Weighing Partial Bottles, Kegs and other Containers This section has general instructions for using any scale to weigh your bottles, kegs and other containers. This section should be reviewed before using any type of scale. This section covers the following topics with which you will have to be familiar with in order to successfully use a scale to weigh bottles for your Inventories. • Estimating Quantity vs.
Weighing Bottles (cont.) Estimating vs. Weighing There are two ways to count partial bottles and kegs. The simplest is to enter partial bottles using decimal notation (e.g., .5). However, this method requires you to estimate how much liquor is in a bottle, keg or other container. This is generally okay when you’re doing a Full Inventory and the margin of error is balanced out over a large quantity. But to be more accurate, you might consider weighing your bottles.
Adding and Weighing Partial Bottles (cont.) Using the correct Weight Display Format Barkeep allows you to enter partial bottle weights in Pounds, Ounces and 1/8’s of an ounce rather than Ounces so that you don’t have to translate the data from your digital scale before entering it into BarkeepApp. In other words, you can set BarkeepApp to match the Weight Format your scale uses. You can also enter weight in 1/10’s of an ounce, kilograms or grams.
Adding and Weighing Partial Bottles (cont.) Setting Full and Empty Bottle Weight Before you start weighing bottles during an Inventory you must make sure an Item’s Full Bottle Weight and Empty Bottle Weight are included in the Item details. Many of the pre-installed “default” Items as well as some of the over 75,000 Items on the Barkeep Server have weight information. See page 24 for more information on pre-installed Items.
Adding and Weighing Partial Bottles (cont.) Full and Empty Bottle Weight You can set the Full and Empty Bottle Weights when you add a new Item or you can return to that Item later and add those details. As with any Item details, you can add and edit information manually. After you weigh full and empty bottles, read the weight from the scale and enter the information into your Item’s details. You may wish to review the Editing Items Section for instructions on editing existing Items.
Adding and Weighing Partial Bottles (cont.) How does Barkeep calculate amounts based on Weight? When you are conducting an Inventory and weigh a partial bottle, this is the formula that Barkeep uses for calculating the volume of liquor in a partial bottle: Bottle Volume * ((Partial Bottle Weight – Empty Bottle Weight) / (Full Bottle Weight – Empty Bottle Weight)) Below is an example showing an Item that has the Full Bottle Weight and Empty Bottle Weight added into the Item Details.
Adding and Weighing Partial Bottles (cont.) Weighing the Bottles The following pages have instructions that are for all users who weigh their bottles. Below are instructions for users who weigh their bottles with a digital scale and then enter the weight manually. The next page has instructions for users with an approved Bluetooth digital scale purchased from Barkeep that will enter the weight automatically into your Inventory.
Adding and Weighing Partial Bottles (cont.) with a Bluetooth Digital Scale Are you connected? The Bluetooth icon will appear next to the weight fields on the Inventory Item Entry screen to indicate that your iOS Device is communicating with your approved Bluetooth digital scale. If you cannot see the Bluetooth icon: • Make sure that your scale is on. • Next to the Reflex Bluetooth digital scale’s weight display is a battery indicator light. Green indicates the built-in battery is fully charged.
Adding and Weighing Partial Bottles Weighing the Bottles with a Bluetooth Digital Scale (cont.) To weigh a bottle with a Bluetooth digital scale* and automatically add the amount to an Inventory: 1. Select the Item. 2. Switch the quantity format from Bottles to Wt. 3. Be sure that your Weight Format set in Barkeep matches the format used by your scale (see page 8). 4. Place your bottle on the scale. 5. Wait a few seconds for the scale to register the partial bottle weight.
Adding and Weighing Partial Bottles (cont.) Adding Multiple Entries for the same Item Important: To add partial bottles by Weight, you will need to make separate entries for full bottles and an entry for each individual partial bottle. For example, if you have three full bottles of Absolut and one partial bottle, you will need to: 1. Add the 3 Bottles and press . 2. And then add the individual partial bottle by re-selecting Absolut. 3. Press the “Wt” button on the Unit Selection control. 4.
Adding and Weighing Partial Bottles (cont.) Weighing Multiple Bottles Important: Always weigh one bottle at a time! Never add together multiple partial bottles as a single weight entry. BarkeepApp will automatically deduct the weight of a single bottle to determine the quantity of liquor that remains in the bottle. If you add the weights of more than one bottle together, there is no way for BarkeepApp to know how many bottles to deduct from the weight entered.
Adding and Weighing Partial Bottles (cont.) Weighing Items - Incomplete Information BarkeepApp will allow you to enter weights of partial bottles without Full and Empty Bottle weights. You will receive a pop-up alert warning, but still be able to enter the weight information. Without Full and Empty Bottle weights added to the Item’s detailed information, your results will be far less accurate. At a minimum we recommend adding a Full Bottle weight for each Item you intend to weigh.
Setting up a Bluetooth Digital Scale You may use a digital scale to weigh bottles. If you would like to manually enter partial bottle weights into BarkeepApp, you can use any digital scale to weigh the bottles and choose the Weight Format in BarkeepApp that matches your digital scale. Important: If you would like to have BarkeepApp automatically detect the weight of partial bottles using Bluetooth, you must purchase a certified Bluetooth digital scale from barkeepapp.com.
Setting up your Reflex Scale The Reflex Bluetooth digital scale is the newest model digital scale available from Barkeep. To purchase a Reflex Bluetooth digital scale, see barkeepapp.com. Getting Started The instructions are simple: 1. The first step is to install 4 (four) AAA batteries. The battery compartment is located on the underside of the scale. After you have installed batteries, you are ready to start using your Reflex Bluetooth digital scale.
Setting up Your Digitag Scale The first step is to register the Digitag Bluetooth scale with Barkeep. 1. Turn on the Digitag XHBMS digital scale. 2. Launch BarkeepApp. Press “Settings” and select Bluetooth Scale . 3. A pop-up menu will ask you to “Choose Your Scale.” Select Digitag. 4. Check that “Autodetect Bluetooth LE Scales” is set to . 5. Press “Search for Devices.” 6. You should see a Device named “Sensor” displayed. Select that Device and press Save .
Setting up Your Digitag Scale (cont.) 7. Press “Pair” 8. Once you've paired BarkeepApp with the scale, the Device Status should change to Paired. 9. The PIN should be left blank – the XHBMS does not require a PIN. Note: When your iOS Device is searching for the Digitag Bluetooth scale it might also detect other Bluetooth devices nearby.
Adding Cases To add cases to an Inventory: 1. First select the Item that you want to add to the Inventory. 2. On the Inventory Item screen press the “Cases” button. Note: When selecting “Cases” Barkeep shows the price per case. In the example below a bottle of Absolut 1L costs $23.83, there are 12 bottles in a case and the price shown is $285.96 ($23.83 x 12). 3. When “Cases” is selected, the Item size will change to display “Case of N” where N is the number of Bottles/Cans in a Case (12).
Adding Cases and Bottles together in the same Inventory If you want to add both cases and bottles of the same Item to an Inventory, you will need to add the Item twice. For example, if you have 3 cases of Absolut and 2 bottles of Absolut. You can either add the Item once indicating there are a total of 38 bottles, or you can add three cases and then go back to the Item and add two bottles as a separate entry as shown in the example below.
Changing Inventory Locations If you are adding Items to multiple Locations within a single Inventory, you can easily switch between Locations in the middle of an Inventory. To change an Item’s Location you have two options: Option 1 The top of the Inventory’s Item List screen has a drop down menu where you can assign or change a Location for the Item you are adding to the Inventory. Option 2 To change the Location, first select an Item that you want to add to the Inventory.
Managing your Inventories The Inventory Screen The Inventory screen shows you the details for a single Inventory and allows you to add Items to the Inventory, delete Items from the Inventory, modify Items in the Inventory, edit the details of the Inventory itself, or delete the entire Inventory.
Inventory Sort Order To sort an Inventory: 1. You can choose to sort the Items list by pressing Sort at the bottom of the toolbar. 2. An action menu appears with four options to sort you’re the Items in your Inventory by: • Location • Inventory Order – First to Last • Inventory Order – Last to First • Item 3. You may re-sort the Items so that they are displayed in exactly the same order in which they were added to the Inventory (First to Last).
Inventories List When you select Inventories on the Main Screen the next screen you will see is the Inventories screen. This is where you press the icon to start a new Inventory but it also is the screen you go to review your existing Inventories if you need to edit Inventory details, make changes by adding and deleting Items in the Inventory and also to delete existing Inventories. Filter and Sort When reviewing your Inventories, Barkeep has options to Filter Screen.
Inventories List (cont.) Sorting When reviewing your Inventories, Barkeep has options to sort the Inventories on the Screen. Note: If you have made selections to filter your Inventories (see previous page), Barkeep will sort the filtered list. The example below shows a list with Banquet Inventories. By default Barkeep displays your list in the order Last to First – showing the most recent Inventory at the top of the list. When you select to Sort Inventories, you can choose to: • Sort First to Last.
Editing an Inventory To edit properties of an Inventory, such as the Inventory Type or Inventory Date/Time for a particular Inventory, do the following steps: 1. Go to the Inventory screen for the Inventory that you’d like to modify. 2. Press Edit on the bottom toolbar. 3. After making your changes in the Edit Inventory screen, press to Save your changes or select Cancel to discard them. Inventory Properties The properties that you can set on an Inventory are: Property Date Description Notes Invoice No.
Locked Inventories BarkeepOnline includes a feature where you can lock any of your Inventories by clicking on the lock icon next to the Inventory. • The icon indicates whether the Inventory is locked. • All Inventories are unlocked by default. • If an Inventory is locked, you cannot edit the Inventory. You must first unlock the Inventory to make changes. • You can lock or unlock an Inventory only when you are logged in to BarkeepOnline. • You can still view a locked Inventory, but it cannot be changed.
Editing Inventory Items To edit details of an Inventory Item do the following: 1. Select the Item you would like to modify from the Inventory screen. 2. This will take you to the Inventory Item screen. 3. In the Inventory Item screen, you can: • select a different Item • change the Quantity • change the Units (Bottles versus Wt versus Cases) • change the Location of the Item 4. After making your changes, you can press to save your changes or select them.
Deleting Inventory Items To delete an exiting Item in an Inventory you have two choices. You can delete an Item from an Inventory by either: 1. Swiping your finger horizontally across an Item in the Inventory screen and then pressing the button. 2. Or press the button in the Inventory Item screen. After you press , an action menu will appear. Press Delete to confirm you would like to delete the Item or press Cancel to keep it.
Double-Check Your Inventory Once you’ve completed an Inventory, it’s a good habit to double-check the Inventory. It is very easy to miscount Items or miss a product or two while doing your Inventory. 1. 2. 3. 4. 5. The easiest way to do that is to select the Inventory you’d like to double-check in BarkeepApp. On the Inventory screen, press Sort at the bottom of the toolbar. An action menu appears with four options to sort your Inventory. Select First to Last.
Repeat Inventories Repeat Inventories are a way to save time when you need to perform the same Inventory on a regular basis. For example, we perform a Premium Liquor Inventory every day. This involves counting all of the Premium Liquor Inventory in five different Locations and weighing all partial bottles. The size of our daily Premium Inventory is 110 Items in five Locations. Our Premium Liquor Inventory is exactly the same process every day. We know how many Items should be in each Location.
Repeat Inventories – Skipping Items When repeating an Inventory, you sometimes come across Items that you want to skip. For example, if there is no Bacardi 151 at Bar 1 today because someone forgot to restock last night, and the Inventory Details screen is displaying: • Location: Bar 1 • Item: Bacardi 151 – 1 liter • Quantity Type: Bottles You need a way to skip this Item and move on to the next one in the list. There are two ways to do skip an Item: Option 1 1.
Repeat Inventories (cont.) Interrupting a Repeat Inventory …and then Continuing To interrupt a Repeat Inventory, do the following: 1. You can interrupt a Repeat Inventory by pressing the button. 2. This will dismiss the Inventory Item screen without adding the currently displayed Item to the Repeat Inventory. 3. Even after you interrupt a Repeat Inventory, you can still come back, press the icon and Continue the Repeat Inventory at a later time. 4.
Transfer Inventories Transfer Inventories are used to keep track of liquor moved between Locations. You will need to create a Transfer Inventory when you move those Items if you intend to track liquor usage by Location. Note: Each Transfer Inventory has a single from Location, which is the Location that Items are moved out of. A single Transfer Inventory can transfer Items to multiple Locations. To create a Transfer Inventory follow the same steps used to create other Inventories: 1.
Transfer Inventories (cont.) 8. After the Transfer Inventory is created. You will automatically navigate to the Search Items screen for the new Transfer Inventory. 9. You can add Items by searching. Or you can start scanning Items by pressing Scan. The scanning steps are the same as with other types of Inventories. 10. At the top of the screen you will notice the Location menu. Pressing the menu drops down your list of Locations and allows you to select a Location to transfer the Item(s) to (e.g., Bar 1).
Waste Inventories Are used to track when liquor is lost rather than used. If product is wasted or bottles break, you must do a Waste Inventory. Waste Inventories differentiate between liquor that has been wasted or lost versus liquor that has been sold. They are crucial for determining an accurate Pour Cost. For example, if a case of Budweiser was dropped in the Store Room in the afternoon before a Full Inventory, you need to do a Waste Inventory to show what happened to that product.
Waste Inventories (cont.) 8. You can add Items by searching. Or you can start scanning Items by pressing Scan. The scanning steps are the same as with other types of Inventories. 9. At the top of the screen you will notice the Location menu. Pressing the menu drops down your list of Locations and allows you to select the Location where the waste occurred (e.g., Walk-in Cooler). 10. Now you can start adding Items to your Inventory following the same steps you would with any other Inventory. 11.
Empties Inventories Used to track the empty bottles (breakage) at the end of the night. Empties Inventories have no effect on your Usage Reports. Conducting Empties Inventories is not crucial, however, you can compare the Empties totals to Usage totals to track discrepancies. Empties Inventories can help you track down Items that appear to be going missing.
Receiving Inventories Receiving Inventories are used to track when you receive deliveries of beer, wine, liquor and all product you list as Items in BarkeepApp. We recommend always taking a Receiving Inventory after every delivery. This step is crucial because you need to account for all Items you receive in order for Barkeep to generate correct Pour Cost and Usage Reports.
Receiving Inventories (cont.) To create a Receiving Inventory: 1. Press Inventories on the Main Screen then go to the Inventories screen. 2. Next, press the icon on the bottom toolbar on the Inventories screen to create a new Inventory. 3. On the Create Inventory screen, choose “Receive.” 4. By default, the Date/Time for the Inventory will be the time you created it. a. You can select Edit if you wish to assign a specific Date/Time when the delivery occurred. b.
Receiving Inventories (cont.) 10. If you do not want to search for Items to add to your Inventory, press Cancel at the upper part of the screen. 11. You can start scanning Items by pressing Scan. The scanning steps are the same as with other types of Inventories. Note: If you are scanning cases, some Items may have a different UPC barcode on the outside of the case than on the actual bottle. See page 34 for instructions for assigning more than one barcode to an Item. 12.
Receiving Inventories – Adding Cases When adding Items to a Receiving Inventory you can add Items by the Bottle (or other Container Type e.g., Can, Keg, etc.) or you can add Items by the Case. When entering Items by Case, you enter the Case price instead of the per Bottle price. The example above shows where you can add Bottles of Absolut by the Bottle at $21.20 each or by the Case of 12 at $254.20 per Case. This feature can be particularly useful if your Supplier’s invoice shows Items priced by the Case.
Receiving Inventories (cont.) Adding Case and Bottle Barcodes You may assign more than one barcode for the same Item. For example, many manufacturers have a barcode for a single bottle as well as different barcodes for a case of 6 bottles and 12 bottles, etc. For instructions for adding a barcode to an Item, see page 34. Basically, you repeat the steps for adding a barcode.
Receiving Inventories (cont.) Adding Case and Bottle Barcodes 9. Barkeep will take you back the Barcode Details screen. 10. Scroll down and notice there are now two barcodes for the same Item. 11. Press to Save the barcode or select Cancel to discard the changes. Cases vs. Bottles – an important reminder! When adding Items to an Inventory remember to switch between Bottles and Cases (see above). BarkeepApp remembers the last Container Type used by default.
Receiving Inventories (cont.) Verifying Amount Totals As soon as a Receiving Inventory is complete, we recommend that you verify that the amount of beer and liquor on the Invoice matches the amount of beer and liquor that you actually received. This step will help you to immediately spot and correct an error in your Barkeep data and make sure all your Reports are accurate.
Receiving Inventories (cont.) Price Changes If your Supplier has charged a different Item price, you need to edit the Item’s information and update the price for the Item. You can do this during a Receiving Inventory when you enter the new price. If the price change is permanent, be sure to select to make the new price the default price. Below is an example that shows an instance where the vendor has increased for an Item and you have to return to the Inventory to make a correction: 1.
Receiving Inventories (cont.) Adding Suppliers to Receiving Inventories To add a Supplier to a Receiving Inventory: 1. On the bottom toolbar press Edit. 2. On the Inventory Type screen, press Edit next to the Supplier field. 3. This activates a screen with a picker where you choose one of your Suppliers to assign to the Receiving Inventory (e.g., Acme Liquor). 4. Press Save to save your choice or select Cancel to discard it. 5.
Return Inventories Return Inventories are ways to account for products returned to a Supplier. They are basically the opposite of Receiving Inventories. These typically match up to credit invoices from your Supplier. Items entered into Return Inventories will show up as negative amounts in the Received column of a Usage Report. For example, if you receive a case of Absolut and return two bottles of Absolut the Receiving quantity in your Usage Report will be 12-2=10.
Deleting Inventories If you do not register your Device with BarkeepOnline, by default all of your Inventories will remain on your Device. You may choose to delete individual Inventories (see instructions below). Note: Your Inventories and other data will not be backed-up unless you choose to back-up your Device to your laptop or desktop computer.
Reporting Barkeep provides a number of different built-in reports. These reports are available either by: 1. Pressing the Reports on the BarkeepApp Main Screen or 2. Pressing action icon on the left side of the bottom toolbar for a particular Inventory.
Report Email When you run a report, BarkeepApp automatically creates an email. The email contains both an HTML version of the report, which is embedded in the text of the email, and an attached Excel spreadsheet version of the report. By default, the email is sent to the email address specified in your Account Settings. Note: In order to generate a report, your Device must be capable of sending email.
Usage Report The main report that you will use with BarkeepApp is the Usage Report. A Usage Report tells you exactly how much product you've used between two Inventories. The Usage Report is calculated by taking the difference between your Starting Inventory and Ending Inventory and factoring in your Receiving, Return, Transfer and Waste Inventories. The Usage Report calculates how much of each Item (e.g.
Usage Report (cont.) To generate a Usage Report: 1. 2. 3. 4. Go to the Main Screen and select Reports. Then select Usage Report. This will take you to a settings screen specific for the new Usage Report. The first step you will need to take is to press Choose and select a Starting Inventory for your Usage Report. Note: To generate a Usage Report directly from an Inventory, see page 106.
Usage Report (cont.) 5. After you press Choose, you will see a list of Full Inventories. Press on the Inventory you would like to select. In this example choose the May 28th Full Inventory as the Starting Inventory. 6. Barkeep will return you to the screen where you now repeat the steps to press Choose, this time for an Ending Inventory. 7. This takes you to a list of Full Inventories that were taken after the May 28th Starting Inventory. The Ending Inventory can be chosen from this list.
Usage Report (cont.) Locations By default your Usage Report will include all your Locations. But there may be situations where you wish to focus in on a specific Location(s). When you choose a specific Location or Locations only those selected will be included in your Usage Report. The example below shows selections where your Usage Report will only include information from your Store Room and Walk-in Cooler. Any activity in other Locations will not be included in the Usage Report.
Usage Report (cont.) Report Options Barkeep allows you to switch on five different options for your Usage Reports. All of these options are off by default. One of the easiest ways to become familiar with these options, is to simply try running the same Report with different options turned on and off. • Group by Location Usage Report data can be separated into subtotals by all Locations or the specific Locations you choose for your Report.
Report Options (cont.) • Show Pricing Details When you select to “Show Pricing Details” your Usage Report will have additional information for each Item that goes beyond the Item Price and Cost. Your Usage Report will include starting, received and end prices, values and costs. This is useful when you want to see very detailed cost information and perhaps narrow in on a cost problem. • Show Usage by Oz A Usage Report will show you the number of bottles and other containers you have used for each Item.
Usage Report (cont.) Directly from the Inventory If you have just completed an Inventory (or are reviewing the Inventory in the Inventory screen) and want to generate the Usage Report immediately, do the following steps: 1. Select the Action icon on the left hand side of the bottom toolbar. 2. Choose Usage Report from the action menu. 3. This will take you to a settings screen specific for this Usage Report. The Inventory that you are creating a Usage Report from will automatically be your Ending Inventory.
Negative Usage Spotting Negative Usage and Price Increases in your Usage Reports When you download your Usage Reports as an Excel spreadsheet, some figures may be in red. This can indicate negative usage or an unexpected price increase. Also see the BarkeepOnline User Guide for further information as well as the Support Section of barkeepapp.com also features Troubleshooting Documents on: • Negative Usage • Price Increases Empties Empties do not affect Usage.
Summary Report The summary report shows the total amount of each type of product (Items) that is included in a single Inventory. If you've entered an Item into an Inventory multiple times, potentially in different Locations, the Summary Report will add together all of the quantities and include only the total in the Summary Report. The following sample Summary Report shows the summary of all Items included in the August 15th Full Inventory. It shows that there are 1,081.
Summary Report (cont.) To create a Summary Report, do the following steps: 1. Go to the Main Screen and select Reports. Then select Summary Report. 2. You are presented with a list of Inventories to choose from. Choose the Inventory that you would like to run a Summary Report on. In this example, choose the June 14th Full Inventory. 3.
Summary Report (cont.) Directly from the Inventory Alternatively, if you have just completed an Inventory (or are reviewing the Inventory in the Inventory screen) and want to generate the Summary Report immediately, do the following steps: 1. Select the Action icon on the left hand side of the bottom toolbar. 2. Choose Summary Report from the action menu. 3.
Detail Report The Detail Report contains a line for each time that an Item was added to the Inventory. For example, if you've added an Item (e.g. Heineken 12 oz Bottle) to an Inventory multiple times, there will be multiple lines in the report for each time that the Item was added to the Inventory. Items are not subtotaled for you. This gives you a report with the "raw data" for a given Inventory, which you can review to suit your needs.
Detail Report (cont.) To generate a Detail Report, do the following steps: 1. Select Detail Report from the Reports screen. 2. This will show you a list of your existing Inventories. 3. Choose the Inventory that you would like to generate a report for, in this example choose the st September 21 Full Inventory. 4. BarkeepApp will run the report and automatically create an email with an HTML version of the report embedded in the email and an Excel spreadsheet version of the report attached to the email. 5.
Detail Report (cont.) Directly from the Inventory Alternatively, if you have just completed an Inventory (or are reviewing the Inventory in the Inventory screen) and want to generate the Detail Report immediately, do the following steps: 1. Select the action icon on the left hand side of the bottom toolbar. 2. Choose Detail Report from the action menu. 3.
Pour Cost Analysis The reason behind using a Liquor Inventory Tracking system like Barkeep is to make sure that you aren't losing product either through theft, over-pouring, charging the wrong price, or other common problems. The key to tracking your Liquor Usage is to understand your Pour Cost.
BarkeepOnline BarkeepOnline is an add-on, hosted service that provides the tools to monitor and assess your Pour Cost. BarkeepOnline uses inventory data generated by Barkeep to track Liquor Usage, and combines it with Sales Data either automatically generated by your POS system or manually entered into BarkeepOnline.
Configuring Your Device for BarkeepOnline (cont.) To register your Device with BarkeepOnline: 1. Verify you have a reliable network connection and plenty of battery life. 2. Press the Settings button on the BarkeepApp Main Screen. 3. Then choose BarkeepOnline . 4. Enter the Username and Password that you chose when setting up your BarkeepOnline account. 5. Press Register Device . 6.
Sync Automatically Once you have registered your Devices, any changes that you make on your Devices will be automatically synchronized with your BarkeepOnline account. And any data on your BarkeepOnline account will be automatically synchronized with your Devices. Multiple Devices can be kept in sync via a single shared BarkeepOnline account. By default, BarkeepApp will automatically sync changes between your Device(s) and BarkeepOnline.
Glossary Banquet Inventories: A list of Transfer, Receiving, Return, Waste, and Empties Inventories associated with a Banquet. These inventories are directly associated with a Banquet, and will be used to calculate Banquet Usage. Captuvo – is a barcode scanner that is capable of 1D and 2D scanning. The Captuvo scanner is a small cradle that you slide an iPod Touch into. The cradle provides a barcode scanner, magnetic stripe reader for swiping ID’s, and backup battery supply.
Location – refers to separate Locations in your bar. For example, you can have a single Location named "My Bar," or you can have many Locations like "Storage," "Walk-In Cooler," "Well 1," "Well 2," "Patio Bar," etc. Barkeep is able to track Inventory and usage by multiple Locations. You may set up just one Location or any number of Locations to suit your business. Linea Pro – is a barcode scanner. This is the same Device used in all Apple Stores to scan Items and process credit card transactions.