
Specifications


DigiPoS Retail Blade
™
Manual
Onboard Diagnostics for the DigiPoS Retail Blade™
Diagnostic Overview
The DigiPoS Retail Blade™ has, built onto the motherboard, an area of memory
specifically for diagnostic purposes. This memory area and the software stored in it have
been designed so that system tests can be run without interfering in any way with the
operating system or user applications. This software gives the ability to get detailed
information about a system status and will report on any system defects found. The
software has the ability to display real time system information from a remote system over
an IP network. The results of tests performed are recorded on the system and can be
transmitted to a diagnostics web site when used as part of the web services suite.
Diagnostic Procedure
1. Close down any applications that are running within your operating system and
double click the DigiPoS Diagnostics Icon. The program will shut down software
that is running and then re-starts the system automatically.
2. If you do not have this Icon or program installed, shutdown and restart the Retail
Blade™. When the Retail Blade™ re-starts, press the F9 key at the BIOS flash
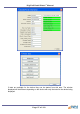
screen. After a short pause, a screen should appear called ‘BOOT MENU’.
Using the arrow keys on the keyboard, move the highlighted section down to
select the option: - Diagnostics: Once you have done this, press ENTER and
the Retail Blade™ will now boot into Diagnostics.
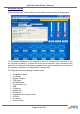
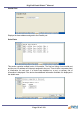
3. The main diagnostic screen (as detailed below) will appear after a short period
of time.
4. Exercise each of the test procedures as described in the following sections.
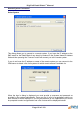
5. After each test has been completed exit the diagnostic program using the
appropriate menu selection (REBOOT SYSTEM) and the Retail Blade™ will
automatically re-boot back into your operating system.
Page 51 of 103