
Instruction manual


-7-
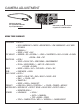
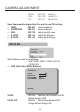
INSTALLATION. VANDAL DOME
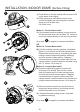
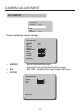
7a) Re-attach the dome cover. Align arrows according to the
diagram below to ensure a weatherproof seal.
7b) Use the allen key to tighten the tamper screws.
Note: Make sure dome cover cord does not get caught in
the rubber seal.
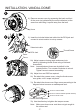
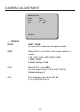
6a) Adjust camera viewing angle and secure into
place by tightening thumb screw using a at head
screwdriver.
Note: Lens adjustment levers are by default in the
locked position. Turn counter clockwise to unlock.
Tighten levers to secure lens setting.
6b) Adjust lens and OSD as required.
6c) Re-attach the camera cover, using the thumb screw
as a guide, until it snaps into place.
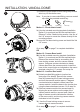
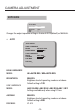
5) Insert the included video test cable into the RCA jack and
connect to a test monitor to set up camera.
4) Remove camera cover by squeezing the back and front
of the cover (as indicated by the arrow indicators) at the
same time and lifting it up and away from the lens.
1
2
3
7
5
6
4
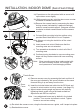
Arrow
Video test cable
RCA Jack
Zoom
Thumb Screw
Focus
Arrow on camera base
Correct arrow alignment
Arrow on camera module (inside camera)
Arrow on dome cover.
1
2
3