QU DNS1010 Dual-codec Video Server ICK INSTA LLATION GU IDE
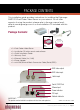
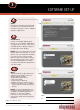
PACKAGE CONTENTS This installation guide provides instructions for installing the Digimerge DNS1010 Dual-Codec Video Server on your network. For all other aspects of using the product, please refer to the user manual available at www.digimerge.com or on the Installation CD included with this product. Package Contents: • 1 x Dual-Codec Video Server • 1 x Installation CD with manuals and software • 1 x Quick Installation Guide • 1 x Warranty Card • 1 x Ethernet Cable (1m / 3.
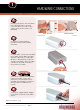
1 Hardware CONNECTIONS A Mounting Instructions: Run the cables to the desired location. Securely mount the device to a wall or other surface using 4 metal screws (not provided). WALL MOUNT B Connect the network cable to the Video Server’s RJ45 network connector. C Connect a BNC camera (not included) to the Video Server’s BNC Input port (left port). Optionally, an audio input device (i.e. Microphone) can be connected to the Audio In port.
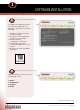
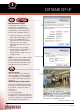
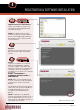
2 SOFTWARE INSTALLATION A The Digiconsole application loads from the CD included with your package, and provides you with the following: 1. Web links to various resources and documentation 2. Discovery of all the Digimerge IP devices on the network 3. Provides Network configuration of IP Devices 4. Installs DigiConsole and Surveillance application on your local PC 5. Warranty information and DDNS registration B Digiconsole Utility screen consists of the following menus: 1. Home 2. Find Devices 3.
3 SOFTWARE SET-UP A Home: Provides basic Digiconsole operating instructions, links to product information/documentation as well as 3rd party software support links. B Find Devices: Locates all available Digimerge IP devices on your network and displays a snapshot of the results. Click on any available device to display image on the right side screen display. NOTE: You may need to press the Find Devices button several times as some devices may not respond immediately.
3 SOFTWARE SET-UP Continued C1 OPTIONAL Edit Network Parameters: The Network Parameters are automatically assigned to the Device by the network router (by using DHCP). These settings can be manually changed if desired. 1. Select the IP device you would like to edit by clicking on its icon. 2. Click on the MENU button or right click the icon for the device to access the menu. Select “Edit Network Parameters” from the menu. 3.
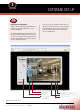
3 Continued SOFTWARE SET-UP C3 Open Device in Browser: Opens up the DigiViewer Video Browser using your default web browser (e.g. Internet Explorer). The DigiViewer browser allows the user to view streaming video from the device as well as change certain settings on the device depending on the level of access set by the administrator.
3 Continued SOFTWARE SET-UP 3 Levels of User Access: • Administrator (current user) • Operator (general user) Default User Name: guest Password: • Viewer (anonymous guest) Creating Current User Account: 1. Click SETTINGS 2. Select ACCOUNTS 3. Fill in a user name and password in the assigned fields 4. Reconfirm password 5. Click UPDATE ACCOUNTS 1. Administrator: Administrator has unrestricted access to all the settings of the device.
This page is intentionally left blank. www.digimerge.
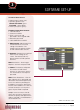
4 REGISTRATION & SOFTWARE INSTALLATION C4 OPTIONAL Update Firmware in Video Device: Opens up a window to search your computer for downloaded firmware (with .bin extension). NOTE: This product will not automatically check for firmware updates. Please visit the Digimerge website to download the most current firmware for your product. D Register: Provides you with information on the device warranty and/or free DDNS service.
4 REGISTRATION & SOFTWARE INSTALLATION Continued F OPTIONAL Surveillance Software: Digimerge provides a complimentary 32 channel surveillance application. The application allows you to - View multiple cameras simultaneously on the same screen - Record video from multiple cameras to PC hard drive - Scheduled recording The application is optional as we offer software solution compatibility with some of the premier IP software developers in the industry.
5 DDNS SET-UP AND REGISTRATION Port forwarding on your router and the creation of a DDNS account with Digimerge is required in order for you to have remote internet access. A Open your Web Browser. Enter http://ddns.digimerge.net B Select the Create Account Option http://ddns.digimerge.net Create Account C Complete Account Information 1 3 D Select the Create New Account Link 2 1. For Product License: Select your Product Model Number from the drop down menu (DNS1010) 2.
5 Continued E DDNS SET-UP AND REGISTRATION An Automated Confirmation email will be sent to you. Make sure to Record the following information. • Your account name is: (e.g.) myhouse1 • Your account password is: (e.g.) password • Your Digimerge license number is: (e.g.) IPNC-000000000000 You can visit http://ddns.digimerge.net to change your account information and to set up additional Digimerge devices. Set up your IP product to use this service as follows: 1.
6 Power OVER ETHERNET (PoE) Power over Ethernet, also known as PoE, is a technology for carrying power along with data on standard CAT5 network cables, allowing devices to be powered via their network ports. It is supported by some devices directly (i.g. 802.3af compliant or “PoE Enabled” devices) while other devices require PoE accessories, such as PoE Endspans, PoE Midspans, power injectors and/or active splitters, in order to make use of the technology.
7 Digimerge ip camera LINE-UP • Full Range of High Resolution (520TVL+) Cameras • Dual Codec (MPEG4/MJPEG) • Hardware Solutions to Fit Most Common CCTV • Full D1 Resolution (@ up to 30fps) Applications (Day/Night/PTZ/ WDR/ Weatherproof/ • Complete Software Solution Included Vandalproof/PoE) DNP5220E High Resolution Low Light IP Professional Camera with PoE DNS1010 Dual Codec Video Server DNP5320E High Resolution Weatherproof IP Day / Night Camera with 90ft IR Range & PoE DND7220V High Resolution
8 IT’S ALL ON THE WEB Product Information User Manuals Quick Start Guides Specification Sheets Software Updates Firmware Upgrades For additional information or troubleshooting help, refer to your owners manual for assistance. You can also call or email for further support. Toll Free Technical Support: 1-866-344-4674 or +905-946-8477 Email Support: tech@digimerge.com Website: www.digimerge.com www.digimerge.