
User Manual
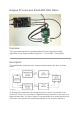

Demo Setup
Hardware Setup
1. Connect the Analog Discovery 2 board to the host computer using a MicroUSB
cable.
2. Connect the Eclypse Z7 board to the host computer using a MicroUSB cable
through PROG MicroUSB port and power the board using the 12V Power Supply.
Flip its power switch to turn it on.
3. Connect the two Zmods ADC and DAC to the Zmod connectors of the Eclypse Z7
board as follows:
Zmod ADC 1410 to ZMOD A connector of the board
Zmod DAC 1411 to ZMOD B connector of the board
4. Connect the BNC adapter board to the Analog Discovery 2 board
5. Make the following physical connections:
Analog Discovery 2 AWG1 to Zmod ADC 1410 CH1
Zmod ADC1410 to Eclypse Z7 SYZYGY ZMOD A
Zmod DAC1411 to Eclypse Z7 SYZYGY ZMOD B
Zmod DAC1411 CH1 to Analog Discovery 2 SCOPE C2
Zmod DAC1411 CH2 to Analog Discovery 2 SCOPE C1
Note: Since the Zmods use SMA connectors, use of BNC-to-SMA cables (or BNC-
to-SMA adapters with BNC or SMA cables) is recommended for the Zmod to BNC
Adapter physical connections.
Software Setup
1. Follow the instructions provided in the README file from Digilent Vivado
Scripts repository, to recreate the project:
Using git, clone the repository on your host computer:
git clone --recursive https://github.com/Digilent/Eclypse-Z7-HW -b low_leve
l_zmod_adc_dac/master
Open Vivado and use the instructions provided in Workflow 1 (Cloning a Repo
that uses this Submodule) of the README. Make sure to change directory
into the Eclypse-Z7-HW folder that was just cloned, prior to running the
following command (if using the Vivado TCL Console instead of Python):