The moment keeps going Jackie on holidays - Great ocean road, Melbourne Bringing memories to life! For additional hints & tips - visit us at www.digiframe.com.au For Repairs & Service please contact CUSTOMER SERVICE on 1300 559 881 or email info@digiframe.com.
Precautions Do not subject the device to severe impact Do not use the device in extreme hot or cold, dusty or damp conditions. Do not expose it to direct sunshine. Keep the device away from water or other liquids. In the event that water or other liquids enter the device, power off the product immediately, and clean the device with soft cloth. Do not use a chemical solution to clean the device in order to avoid corrosion. Clean it with a dry cloth.
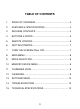
TABLE OF CONTENTS 1 PRODUCT OVERVIEW...................................................... 4 2 FEATURES & SPECIFICATIONS ....................................... 4 3 PACKAGE CONTENTS...................................................... 4 4 BUTTONS & PORTS.......................................................... 5 5 REMOTE CONTROL ......................................................... 6 6 GETTING STARTED ..........................................................
1 PRODUCT OVERVIEW The DigiFrame 7inch “Disco Series” Digital Photo Frame enables you to view your photos on its high-resolution LCD screen. Simply insert a USB flash drive or SD memory card into the appropriate slot located on the back of the frame and your pictures will be displayed on the screen.
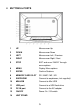
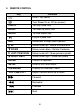
4 BUTTONS & PORTS 1 UP Move cursor Up 2 DOWN Move cursor Down 3 LEFT Move cursor Left / Previous 4 RIGHT Move cursor Right / Next 5 STOP EXIT and move “BACK” through 6 MENU Display Menu options 7 ENTER Confirm Sections 8 MEMORY CARD SLOT SD / MMC / MS / XD 9 EARPHONE Connect to earphones (not supplied) 10 MIN-USB Connect to Mini USB 11 USB port Connect to a USB flash drive 12 DC IN port Connect to the AC adaptor 13 ON/OFF Power On / Off switch 14 UNIT STAND menu op
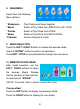
5 REMOTE CONTROL Key Function Mute – No Sound Turn Power On or Off (on screen) PHOTO To Play Photo files MUSIC To Listen to Music files MOVIE To View Movie files Play or Pause files EXIT Move back through Menu options UP Move cursor up / Rotate Anticlockwise DOWN Move cursor down / Rotate Clockwise LEFT/ PREVIOUS Move cursor left / Show previous photo RIGHT/ NEXT Move cursor right / Show next photo ENTER Confirm a selection SETUP Enter or Exit main menu CALENDAR Display the calendar
6 GETTING STARTED Step 1: Step 2: Step 3: Adjust the stand outwards so the unit will rest in position Connect the device to a wall outlet and switch Power On using the switch located near the USB port Insert a USB flash drive into the USB port or a memory card into the card slot.
MAIN MENU Select from the following Menu options: * Slideshow – * Movie * Photos * Music *Calendar Play Photos and Music together Select & Play Video files (MPEG1/2/4, AVI, DIVX) Select & Play Photo files (JPEG) Select & Play Music files (MP3 & WMA) Access Calendar & Clock 9 MODE SELECTION Press the LEFT / RIGHT buttons to choose the desired mode. Use the “ENTER” button to confirm all selections.
11 THUMBNAIL VIEW Press the “ARROW Buttons” to select photo from the thumbnail view. Press the “ENTER” button to confirm and start viewing the photos. 12 CALENDAR Your DigiFrame can also be used as a tabletop calendar with time and an alarm clock. To enter the calendar view mode, navigate to “CALENDAR” from the main menu and then press the “ENTER” button to confirm. The calendar & clock page will also display your photos in a slide show.
13 SETTINGS MENU Press the “Setup” key on the remote control (or Menu button on the unit) and a popup menu will appear (invalid during Auto slideshow and whilst in CALENDAR mode) Use UP and DOWN keys to select the desired settings and use the “ENTER” button to enter the sub menu settings. Use the “ARROW Keys” to navigate and adjust and then press the “ENTER” button to confirm the settings changes. Press EXIT to move backwards through the menus and return to the Main Menu. 1.
6. Start Slideshow 7. Rotate Use “ENTER” key to rotate the picture clockwise from 90° - 360° (in slideshow mode, press STOP/PAUSE first) – Available in full screen display. 8. ZOOM Use “ENTER” key to zoom in on the picture up to 10X. When the photo is enlarged, you can press the “ARROW Keys” to roam on the photo. When the picture zooms to 10X, press “ENTER” to restore the picture to original size - Available in full screen display. 9. Save Picture Available in picture playback mode 10.
. Brightness – Contrast – Color & Tint Use these options to adjust the image display properties 13. Alarm To enable the alarm, (1) Press SETUP button to select “SetTime/Set Alarm” and then press the “ENTER” button to confirm. (2) Press UP and DOWN button to select “Set Alarm”. (3) Press the LEFT and RIGHT button to select “OFF” and then press the UP / DOWN button to change “OFF” to “ON”. (4) Press the LEFT and RIGHT button to select among the time setting items – hour, minute, second.
14 TROUBLESHOOTING The digital photo frame will not power on. Make sure that the AC adapter is connected securely to the frame and the power source. Remote control does not work Ensure that a working battery is inserted The images can not be displayed. Make sure the image file is in a supported format The image is distorted or blurred. The device responds very slowly to commands. Resolution of the image is too low. Try using a file with a higher resolution.
15 TECHNICAL SPECIFICATIONS Item Description Display 7.0-inch TFT LCD screen LCD Resolution 800 x 480 Photo Formats JPEG Music Formats MP3, WMA Video Formats MPEG1/2/4, AVI, DIVX Supports Memory Card SD / MMC / MS / XD USB Interface USB 2.
19. Technical Parameters Panel TFT Color Panel Play mode MUSIC / PHOTOS / P&M / VIDEOS External memory cards supported CF / SD / MS / MMC / XD / USB Multi-media formats supported MP3 / WMA / JPEG / JPG / MPEG1 / MPEG 2 / MPEG 4 (Divx - Xvid) Text formats supported TXT Ports Two USB ports, one performs host function / earphone device Power supply DC9V/1.5A Model Arcylic front cover We hope you enjoy your DigiFrame and all your special memories. These parameters are for reference only.