
Specifications


Chapter 3: Setting Up the Fader Module 17
Moving the Spacer Plate
There is a metal spacer plate pre-installed on the right side of
the Fader Module. When installing the Fader Module on the
right of the Main Unit, you will need to remove the spacer
plate from the Fader Module and place it on the right side of
the Main Unit.
To move the spacer plate:
1 Remove the screws holding the spacer plate in place. Make
sure to note the location of the long and short screws as you
remove them.
2 Remove the spacer plate from the right side of the Fader
Module.
3 Replace the screws in the side of the Fader Module, making
sure to replace the long and short screws in their correspond-
ing holes.
4 Remove the corresponding screws from the right side of the
Main Unit, and attach the spacer plate with the same screws.
Do not use a power screwdriver or similar high-torque device
to remove and replace the screws for the spacer plate, as it
might strip the threads in the screw housing.
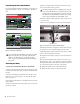
Figure 6. D-Command Fader Module spacer plate
The holes on the spacer plate are countersunk for installa-
tion on the right side of a unit. Do not attach the spacer
plate to the left side of any D-Command unit.
short screws (3)
long screws (6)