
Specifications
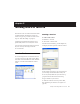
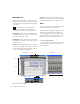

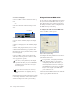
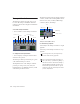
Table Of Contents
- Contents
- Welcome to Mbox
- Windows Configuration
- Macintosh Configuration
- Mbox Hardware and Connections
- Working with Pro Tools LE
- Windows System Optimizations
- Digidesign ASIO Driver (Windows Only)
- Digidesign WaveDriver (Windows Only)
- Digidesign CoreAudio Driver (Macintosh Only)
- Configuring Midi Studio Setup (Windows Only)
- Configuring AMS (Mac OS X Only)
- Index

Getting Started with Mbox40
To use the Click plug-in:
1 Choose MIDI > Click to enable the Click op-
tion.
– or –
Select the Click button in the Transport win-
dow.
2 Create a mono Auxiliary Input (Aux Input)
track.
3 Insert a Click plug-in on the Auxiliary Input
track.
4 In the Click plug-in window, choose a click
sound from the Librarian pop-up menu (this
menu displays “factory default” when you first
insert the plug-in).
5 Choose MIDI > Click Options and set the
Click and Countoff options as desired. (Click
OK to apply these options.)
6 Begin playback. A click is generated according
to the tempo and meter of the current session
and the settings in the Click Options dialog.
Using an External MIDI Click
Pro Tools also provides a MIDI Click option that
lets you use an external MIDI device to play a
click. This feature can be turned on and off in
the Transport window, and is configured from
the MIDI Click Options dialog.
To configure and enable an external MIDI click:
1 Choose MIDI > Click Options.
2 Configure the click parameters as needed for
your MIDI sound source.
3 Select the desired MIDI sound source from the
Output pop-up menu and click OK.
Click and Tempo Controls in the Transport window
The Note, Velocity, Duration, and Output
options in this dialog are for use with MIDI
instrument-based clicks and do not affect
the Click plug-in.
Refer to the Pro Tools
Reference Guide for
more
information on configuring Click op-
tions.
Click button
Click/Countoff Options dialog
See Appendix E, “Configuring Midi Studio
Setup (Windows Only)” or Appendix F,
“Configuring AMS (Mac OS X Only).” for
detailed information on how to identify ex-
ternal MIDI devices connected to your MIDI
interface and configure your MIDI studio
for use with Pro Tools.