
Installation guide

Chapter 5: Installing Pro Tools Software 41
chapter 5
Installing Pro Tools Software
The complete Pro Tools software installation
process includes:
• Preparing your Apple System software for
Pro Tools
• Installing Pro Tools software
• Installing OMS
After software installation is completed, the first
time you launch Pro Tools you will be prompted
to enter your Pro Tools serial number and con-
figure hardware. Instructions for this begin in
“Launching Pro Tools the First Time” on
page 49.
Apple System Software
Settings
To ensure optimum performance with
Pro Tools, configure the Apple System software
with the following settings.
To configure the Apple System software for
optimum Pro Tools use:
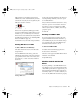
1 In the Memory Control Panel do the follow-
ing:
• Set the Disk Cache to a Custom Setting of
512 K.
• Set Virtual Memory to Off.
• Set the Ram Disk to Off.
2 In the Energy Saver Control Panel, set the “in-
active” time to Never.
3 In the Appearance Control Panel do the fol-
lowing:
• Click the Fonts tab and set the Large System
Font to Chicago. In addition, deselect
“Smooth all fonts on screen.”
• Click the Sound tab and select None from the
Sound Track pop-up menu.
4 If using a Power Macintosh 9500 or 9600, set
the number of colors to 256 in the Monitors &
Sound Control Panel.
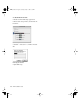
5 In the Extensions Manager Control Panel do
the following:
• Choose Mac OS 9.0 Base (or Mac OS 9.1 Base)
from the Selected Set pop-up menu.
• Click Restart to restart your computer.
If you haven’t already installed Pro Tools
hardware, do so now. See Chapter 3, “In-
stalling Pro Tools Hardware” for instruc-
tions.
TDM_Install.book Page 41 Saturday, January 13, 2001 9:35 PM