
Installation guide

Chapter 4: Connecting Your Studio 39
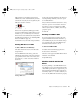
source such as a DAT deck). You should then set
your digital effects devices to accept an external
digital clock so that they will synchronize them-
selves to Pro Tools. In the Pro Tools Hardware
Setup dialog, set the input of the channel pair to
which you have connected the digital effects de-
vice to Digital, and set the Sync Mode to Inter-
nal.
Connecting MIDI Devices
By adding a Macintosh-compatible MIDI inter-
face to your system, you can take advantage of
all the MIDI features of Pro Tools, including re-
cording and editing tracks, syncing to MIDI
Time Code or MIDI beat clock (this requires an
appropriate MIDI interface) and the use of MIDI
Controllers.
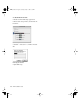
To connect MIDI devices to your system:
1 Connect the MIDI interface to your computer
according to the MIDI interface’s documenta-
tion.
2 Install any MIDI driver software required by
the MIDI interface. (Once you have installed
your MIDI interface hardware and software,
confirm that it is working properly using the
procedure given in the interface’s documenta-
tion.)
3 Connect the MIDI OUT of your MIDI device
or controller to the MIDI IN of your MIDI inter-
face.
4 Connect the MIDI IN of your MIDI device or
controller to the MIDI OUT of your MIDI inter-
face.
Connecting SMPTE
Synchronization Devices
If you intend to synchronize Pro Tools to exter-
nal devices with SMPTE using MIDI Time Code,
your system must be connected properly. This
section provides setup suggestions for synchro-
nizing Pro Tools to audio or video tape. For de-
tails on SMPTE and synchronization, see the
Pro Tools Reference Guide.
Pro Tools and Synchronization
Pro Tools supports a type of SMPTE synchroni-
zation known as SMPTE Trigger through the use
of SMPTE-to-MIDI Time Code converters. This
type of synchronization allows Pro Tools to
chase and start (or stop) playback and recording
while slaved to other systems. With SMPTE Trig-
ger alone, once playback or recording starts,
there is no further synchronization, and
Pro Tools will play back at a rate determined by
the internal clock of the audio interface or se-
lected external clock source.
For information on configuring a MIDI con-
trol surface for use with Pro Tools, see the
Pro Tools MIDI Control Surfaces Guide.
Blue & White Macintosh G3 computers re-
quire additional hardware to allow MIDI
connections. Refer to Chapter 1 of this
guide for more information.
On 9600, 9500, and Beige G3 Power Mac-
intosh computers, connect the MIDI inter-
face to the modem port. MIDI timing data
output through the modem port is more ac-
curate than that output through the printer
port.
See Chapter 5, “Installing Pro Tools Soft-
ware” for information on configuring OMS
(Open Music System) software, which is re-
quired for Pro Tools and MIDI.
TDM_Install.book Page 39 Saturday, January 13, 2001 9:35 PM