
Specifications


9
3. RAISE – Press the DN button. After “C” is displayed, immediately release the DN button, and
press the UP button. Hold until the desired temperature reading is displayed; then release.
4. Press the DN button to verify the new cool cut-out temperature.
2
nd
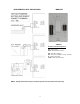
Stage Heat and Cool Cut-in Configuration
The GEN II controller is set up at the factory to stage Y2 and W2 cut-in operation based on a 3-
minute time delay and
supply air temperature. This is done with a jumper which is placed on the
middle and upper pins on TIME/TEMP (Q), and the cut-in delay set at 03 (3 min) in the controller
program. The cut-in temperatures are fixed in the controller program at 57°F (13°C) and higher for
Y2 and 120°F (48°C) and lower for W2. The Y2 and W2 cut-in delay sequence can be field
adjusted (see below).
Adjust 2
nd
Stage Cut-in Time Delay
1. To increase the Y2 and W2 cut-in delay, press and hold the SET and DN buttons (N)
simultaneously. When 03 appears in the display, release the buttons and immediately press
the UP button and hold until the desired delay time is displayed, and release. The time delay
is fully adjustable from 3 - 20 minutes. To verify the change, press and hold the SET and DN
buttons simultaneously until the delay time is shown, and release.
2. To decrease the Y2 and W2 cut-in delay, press and hold the SET and DN buttons (N)
simultaneously. When delay time appears in the display, release the buttons and immediately
press the DN button and hold until the desired delay time is displayed, and release. To verify
the change, press and hold the SET and DN buttons until the delay time is shown, and release.
Configure Y2 and W2 cut-in for time delay and thermostat demand only
1. Place the 2
nd
stage configuration jumper (Q) on the middle and lower pins - TIME.
2. If the Y2 cut-in time delay must be changed from the factory setting of 03 (3 min), follow the
above procedures to raise or lower the time delay value.
NOTE: The cut-in delay timing for W2 (Aux Heat) is set for approximately 3 minutes in the
control program and cannot be manually changed.
3. Verify time delay value by pressing the SET and DN buttons simultaneously.