
User manual


4REA4 Controller Software User Guide
3
V1.30
1.2 Software licence agreement
By using 4REA4 you agree to be bound by the terms of the relevant End User Licence Agreement (EULA), a
copy of which can be found at http://www.digico.biz/docs/about/legal.shtml. You agree to be bound by the
terms of the EULA by installing, copying, or using the software.
1.3 Further information
Please refer to the DiGiCo website for further information, knowledgebase and technical support. For more
information on 4REA4 hardware, system setup and connections please refer to the Getting Started Guides
available for download at www.digico.biz.
1.4 Overview
Connecting the Controller Application to you 4REA4
After installing the relevant 4REA4 Controller software from the downloaded upgrade package (see above –
4REA4 VX.X Installer.exe for Windows or 4REA4 VX.X.dmg for Mac) on your computer.
Connect your computer with an ethernet cable to one of the 4REA4 network ports (front or rear or via an
ethernet switch)
Ensure that your controller computer has a compatible IP address to connect to the 4REA4
The default 4REA4 IP Address is 192.168.1.70 with Subnet Mask 255.255.255.0 and Gateway
192.168.1.254
Your controller computer could, for example, be set to 192.168.1.200 with Subnet Mask 255.255.255.0
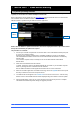
Run the 4REA4 application and click on the System button in the top left corner.
The connected 4REA4 should appear on the Connect To list - If this entry is not displayed, please check
your network settings.
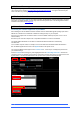
Click the Connect button leaving the yellow highlighted button as Pull settings from unit – wait until the
connection process is complete and you will see confirmation message and a green icon appear next to the
System button – now click the Main button in the top left corner to proceed with configuration.