
Technical data


Page 4 Quick Start
Connect a control terminal to the PortServer
The PortServer is controlled from a terminal (or PC with terminal emulation software) connected
to Port 1 on the PortServer’s back panel. (Any port can be used, but we will use the convention of
Port 1 here.) In some installations, the PortServer can be controlled directly over the Ethernet;
see Configuring the PortServer over the Ethernet on page 5.
Step 1. Turn the PortServer’s power switch OFF.
Plugging any electronic device into another device under power can
cause damage to one or both of the devices.
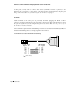
Step 2. Plug your serial terminal into Port 1 on the back of the PortServer box. A 10-pin RJ-
45-to-DB-25 cable is included with your PortServer for this purpose.
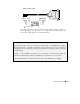
The following diagram shows a simple three-wire cable for connecting a terminal to
the PortServer. Usually, serial terminals and printers need only a three-wire
connection. The PortServer supports XON/XOFF (software) handshaking, so the
only signal lines necessary are Transmitted Data (TxD), Received Data (RxD) and
Signal Ground (SG). Cables must be shielded to remain in compliance with FCC
certification requirements, and the shield should be connected to Chassis Ground
(GND) at one end of the cable run.