
Installation guide


S6 Installation Guide2
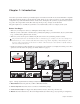
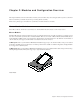
Overview of Installation
1 Determine module layout (“Modules and Configuration Overview” on page 5)
2 Assemble the frame
• Assemble Legs if your system includes them (“Assembling Legs” on page 13)
• Assemble the Frame Chassis kits (“Assembling Frame Chassis” on page 19)
3 Install modules
• Install the Ethernet switch, power supplies and cables (“Installing the Power Strip, PSUs, Switches, and Cables” on page 35)
• Install modules (“Installing Modules” on page 53)
4 Start up your system to confirm module communication, then complete the hardware assembly (Chapter 7, “How to Proceed”)
5 Activate your system purchase online, then log into your Avid Master Account to download and install S6 software updates,
Workstation installers, S6 documentation and other resources (“Updating S6 System Software” on page 67)
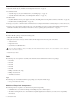
What’s Included
The Master Module package contains the following items:
• Master Module (M10 or M40)
• This guide (S6 Installation Guide), which contains the following items in the front pouch of the binder:
• Activation Card
• Registration Card
• System Restore USB Flash Drive
• Health & Safety Guide
Tools
The following tools are required for assembly of the S6 frame and are included in the Side Covers package:
• Hex M2.5
• Hex M3
• Hex M4
• Hex M5
• Hex M6
• Phillips screwdriver #1 (long)
• Phillip screw driver #2
• Small flat screw driver
Legs
The following tools are included with the Leg Set package (not all systems include Legs):
• One open end wrench (13 mm)
Additional Required Components
The following items are required to use S6 and must be purchased separately:
• USB Flash drive to use when transferring and installing S6 system software updates
• Workstation running Pro Tools or other EUCON-compatible digital audio workstation (see Avid.com for compatibility
information)
Do not use the System Restore drive for anything other than S6 System Restore software. Do not use this drive to store audio files
or any other data or software.