
Installation guide


Chapter 6: Installing Modules 59
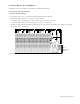
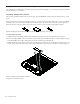
3 After connecting Ethernet to the primary (side panel) Ethernet port of the Master Module, do either of the following (see
Figure 35):
• If you are connecting S6 to an existing DHCP Server on your network, connect another Cable Harness Ethernet cable to Ether-
net port
1 (left) on the back panel of the Master Module.
• If you are not connecting S6 to an existing DHCP Server on your network (and/or if you will be connecting S6 directly to only
one workstation) connect the second chassis Ethernet cable to back panel Ethernet port
2 (right).
If you are unsure of whether you have a DHCP server on your network please consult your IT department.
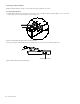
4 If you plan on using the Talkback mic, connect an XLR cable (90-degree jack recommended) to the XLR THRU port on the back
of the Master Module and route it through the opening in the Back Tie Plate. Guide it to the far-left or right corner and down
through the opening between the Side Cover and chassis.
5 Install the connected Master Module in slots 2 and 3 (the Master Module occupies two slots). Make sure to orient it correctly by
seating it fully against the top edge of the Automation Module. Do not fold or pinch its connected cables. (Pay special attention
to the back panel connectors for Ethernet (required) and/or Talkback (optional).
6 After the Master Module is in place, remove the protective plastic from the Touchscreen.
Setting the Touchscreen Angle
After installing the Master Module, set the Touchscreen to your desired viewing angle and lock it in place by tightening the thumb-
screw on the angled stand.
Only connect chassis Ethernet to one of the two Ethernet ports on the back (in addition to the primary module connection on the
side panel). The Master Module supports two Ethernet connections, total, but one must be to the primary side panel port.
Figure 35. Master Module back panel Ethernet ports 1 (left) and 2 (right)
For more information, see the S6 Guide (included with other documentation that becomes available for download in your Avid
Master Account after you activate).
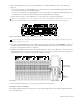
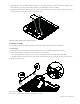
Master Module and Master Automation Module
12
Slot 1
Automation
Slots 2 and 3
Master Module
Module