
Installation guide


Chapter 1: Introduction 1
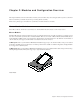
Chapter 1: Introduction
Avid
®
S6 is a professional, modular, ergonomically designed control surface for Avid Pro Tools
®
and other EUCON
™
-compatible
DAWs (Digital Audio Workstations). S6 is flexible and scalable, letting you choose the best system for your needs. Many different
configurations are possible with different numbers of faders, knobs, and displays. All systems let you place the master section in
any position, left-to-right, within a frame. More fader strips, knobs-per-strip, or displays can be added later.
This guide explains how to assemble the system frame, how to install modules, and how to configure your S6 system.
Before You Begin
• Make sure your workspace is clean, dry, is well lighted, and has ample room to work.
• Make sure you have a sturdy table or other flat surface, preferably with padding to protect the hardware. (If your system includes
Legs, you will use the Leg Frame instead of a table.)
• Make sure you have another person available to help lift, turn, and move the system during and after assembly.
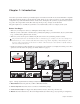
• Identify and organize the packages that make up your purchased system (see Figure 1) to simplify the assembly process. All re-
quired tools are in the Side Covers package (see “What’s Included” on page 2)
1 – Master Module
Includes this guide and your M10 or M40 Master Module.
2 – Frame Components
Chassis kits, Side Covers, Bolster, and Rear Panel packages.
3 – Power and Connectivity
Power Supply Units (PSUs), Ethernet switch(es), Power Strip, and Cable Sets.
4 – Modules
Automation, Fader, Process, Knob, and Display Modules (the number and type vary depending on configuration).
Components and systems are heavy! Team lift, always. We recommend four people, one lifting each corner. Never attempt to move
systems that are five or more chassis in width. Disassemble it first (see Appendix A, “Expanding or Disassembling S6”). Also,
never move or lift a chassis (any size) by the Side Covers, Bolster, or Rear Panels (they can break). Move or lift while holding on
to the metal chassis (frame) instead.
Figure 1. Packages organized before assembling an example S6 M10 16-5 system:
1
3
2
4