
Installation guide


S6 Installation Guide30
Installing Rear Panel Mounting Brackets
Rear Panels support and conceal cables. Rear Panels consist of two pieces, a lower bracket that mounts to the frame, and an upper,
hinged cover that attaches to the bracket. The upper covers have open corners to guide power and Ethernet for Display Modules (if
your system includes Display Modules), and cutouts to support S6 Options (such as the Speaker Bridge and VESA Monitor mount).
To install the Rear Panel Mounting Brackets:
1 Unpack the Rear Panel lower bracket and its fasteners from their packaging (each bracket uses two Hex fasteners and washers).
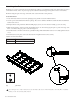
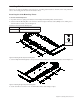
2 Standing at the back of the frame, start at the far left and attach one Rear Panel bracket to the Back Tie Plates of the first two chas-
sis using Hex fasteners and washers. Figure 28 shows how they are attached to the chassis.
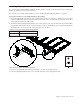
Before tightening the fasteners, make sure the bottom lip of the tray is flat against the lower back edge of the chassis (make sure
the lip is not sitting on, or hooked below, the edge of the chassis) as shown in Figure 29.
3 Set the Upper Covers aside for now. These are attached to the Lower Mounting Brackets later, after cable runs are in place.
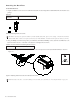
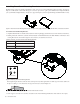
Figure 27. Rear Panel Lower Mounting Bracket (left) and Upper Cover (right). Fasteners, Display Module Fillers, and cutouts not shown.
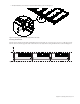
Fasteners, Washers, and Tools for Rear Panel Mounting Brackets
Fasteners
M5x8 SHCS (7760-30593-00)
Washers
M5 WSHR
Tool
M4 Hex
Figure 28. Attaching Rear Panel Mounting Brackets
Figure 29. Side view showing proper alignment of Rear Panel to back of chassis
(Not to scale)