
Product Manual

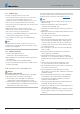

3.4 Mounting the heater
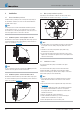
Use the bracket included in the installation kit to fix the heater in a
suitable position on the vehicle.
3.4.1 Installation steps
Use 4 hexagon screws M6 x 12 and 4 hexagon nuts M6 or 4self-
tapping screws 6.3 x 19 to fix the bracket (tightening torque:
9+1Nm),
see Picture 4.
Note
Mounting using self-tapping screws requires the fixing bracket to
have sheet metal thickness 2 – 6mm.
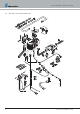
a) b)
Picture 4
a) Mounting using 4 self-tapping screws 6.3 x 19
b) Mounting with 4 hexagon screws M6 x 12 and 4 hexagon nuts M6
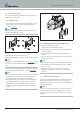
Note
Preferably use the top and bottom fixing holes,
see Picture 4. If using
the other holes, ensure a minimum distance between the fastening
screws.
Insert the heater in the bracket and use screw M6 x 16, SWT30 to
fix onto the bracket (tightening torque: 10+1 Nm),
see Picture 5.
Note
A thread-forming screw is used to fix the heater onto the standard
bracket. It is not necessary to pre-cut a thread. The thread is
formed by the screw on screwing it into the tapping hole.
When installing in the vehicle, always ensure that after fixing the
heater, adjacent components do apply any force on the heater,
neither under static nor under dynamic loading. Ideally, after
installation a distance from adjacent components in the vehicle
remains.
Picture 5
3.4.2 Mounting instructions for thread-forming screws
Position screw by hand and screw in.
– Always keep to the given tightening torque.
When screwing for the second time also position by hand and do
not cut a new thread.
The thread-forming screw is suitable for max. 6 installation
attempts.
In case of repair (removal of heater) a metric screw (M6 x 16) can
be used as an alternative.
Note
If using a vehicle-specific bracket, note and follow the points below:
Use the additional enclosed thread-forming screws – tightening
torque: 10
+1
Nm)
When fixing, ensure that no forces are exerted on adjacent
components, especially not on the plastic cover of the blower/
control box.
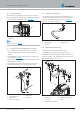
3.5 Mounting the water pump
Use the water pump bracket included in the installation kit to fix the
water pump in a suitable position on the vehicle. Then insert the
water pump in the rubber element and press in until the water pump
has latched into position.
Note
Use the hose and spring band clamps to connect the water pump
to the water sockets of the heater. Clamping range 26 – 28mm. If
using the vehicle’s own hose, check the diameter of the hose before
installing.
18 25.2933.90.0001.0A EN | 06.2018
Technical Description | Hydronic S3 Economy