
User's Manual


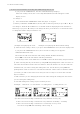

⑤ After setting the day, set the hour and minute
. ⑥ And then, set the hour and minute ending time.
Once END Setting is done, the TIMER icon displays
and the recording is automatically initiated at the
designated time.
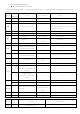
* You may set up to 10 reserved recordings for all the sections in AM/FM/VOICE. It is set
the same way described on the last page. A reserved recording is automatically initiated
even when the power is OFF. (Timer function)
* The reserved recording may be canceled by pressing “ERASE Key” and modified by
resetting on the reserved channel.
* The cancellation during set-up is done by “STOP Key”.
12). Line in
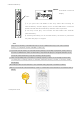
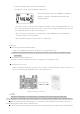
● Connecting an External Microphone
- Plug a pre-amplified microphone in the line in terminal of the body.
※. When an external microphone is connected to the line in, the built-in microphone is not
operational.
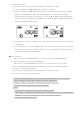
● Connecting to External Devices
You may record from almost any device using the line in and audio cable.
● Connecting to a stereo
When recording from the line in of the voice recorder, connect the audio cable to the line in of
the recorder and to the headphone jack of the output device.
How to Connect to a stereo
※ Note
★ When connecting to an external device, make the connections with the power OFF.
★ Before connecting to any external device, carefully read the manual of the external device
●When recording from an external device, record after connecting the audio cable to this device
and decreasing the volume of the external device.
●To record in the external device, play this device and initiate the recording in the external device
Line-in/out cable