I n t e g r a t i o n Te c h n i c a l N o t e MITEL D/82 Station Set Emulation
Integration ii Te c h n i c a l Note Edition Note This is the first edition of the MITEL D/82 Station Set Emulation Integration Technical Note. Information in this document applies to OneBox UM systems with version 3.0 or later. Copyright Notice MITEL D/82 Station Set Emulation EN/LZT 108 6655 R1A © Ericsson Enterprise AB 2003. All rights reserved. No part of this document may be reproduced in any form without the written permission of the copyright owner.
Integration Te c h n i c a l Note iii Table of Contents Overview....................................................................................................................................... 1 References.......................................................................................................................................................... 2 Features Supported by this Integration.....................................................................................................
Integration iv Te c h n i c a l Note This page is intentionally left blank.
Integration Te c h n i c a l Note 1 Overview This Integration Technical Note (ITN) is written for dealers who are experienced with OneBox UM® and are familiar with its procedures and terminology. This document also assumes that you are familiar with the features and programming of the MITEL SX-200D or SX-2000 telephone system. This document describes how to integrate OneBox UM with a MITEL SX-200D or SX-2000 telephone system, using a Dialogic D/82JCT-U PCI linecard.
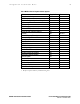
Integration 2 Te c h n i c a l Note References More current information may be available from the following documents: • Installing OneBox • Administering OneBox • Dialogic D/82JCT-U Installation and Replacement spare parts document Features Supported by this Integration Tables 1 and 2 list the features supported with the MITEL Station Set integration. Table 1.
Integration Te c h n i c a l Note 3 Table 2.
Integration 4 Te c h n i c a l Note Critical Application Considerations Known limitations or conditions within the telephone system and OneBox that affect the integration performance are listed here. General recommendations are provided when ways to avoid these limitations exist. • The Dialogic Configuration Manager defaults the PBX switch type as Norstar. The correct PBX switch type, MITEL_DNIC_M430 must be selected prior to starting the Dialogic service.
Integration Te c h n i c a l Note 5 Installation Requirements Review the following information before performing any of the procedures in this document. To successfully install this integration, you must meet the installation requirements both for the telephone system and OneBox. Telephone System Requirements • On the SX-200D, revision G1005 F03.9 or higher software • On the SX-2000, revision MS2006 (M23.
Integration 6 Te c h n i c a l Note Programming the Telephone System Follow the recommendations and programming examples in this section to program the PBX for integration with OneBox. Programming examples show commands and parameters that are necessary for integration, but they do not represent PBX programming in its entirety. Programming instructions for the two MITEL systems listed below are provided on the following pages: SX-200D system with G1005 (F03.
Integration Te c h n i c a l Note 7 Class of Service for OneBox DNIC ports (Form 3) Define the following Class of Service (COS) options to the COS number previously assigned in Form 9. All other assignments may be left at default.
Integration 8 Te c h n i c a l Note Trunk Programming for Call Routing (Forms 14 and 15) Trunk assignments must be made if your application requires the call routing feature of OneBox. Trunks follow the standard Txxx format such as [T099]. (The xxx can equal any number from 000 to 999.) If individual trunk names are to be used, the names must retain the Txxx format. DID and Tie trunks must be renamed from the default (Xxxx) name to the Txxx format for OneBox to answer correctly.
Integration Te c h n i c a l Note 9 Programming the SX-2000 System with MS2006 (M23.2) and Higher Software This section explains how to program a MITEL SX-2000 telephone system with MS2006 (M23.2) and higher software. The installing technician should be familiar with programming this telephone system. For detailed programming information on the MITEL SX-2000, refer to the manuals that accompanied the telephone system.
Integration 10 Te c h n i c a l Note System Options Assignment Options here are critical to the integration. In the System Option Assignment Form [SYS O], program the following assignments. All other assignments should be programmed as needed for your site. Option Multi-line set callback Message cancel timer [1–24 hours] Value blank blank (See note 1) Notes: 1. On versions that do not allow this field to remain blank, set it for 24.
Integration Te c h n i c a l Note 11 Programming the Class of Service Options Assign a unique Class of Service (COS) for all DNIC ports used in this integration within the Class of Service Assignment Form [CLA O S]. All other options can be left unchanged. Do not share this COS with other stations in the system. Program all OneBox DNIC ports into the correct COS by using the Station Service Assignment Form [ST]. Use the same COS for day and both night modes.
Integration 12 Te c h n i c a l Note Subscriber Telephone Programming Subscriber telephones can be programmed at the telephone to forward to OneBox. If the automated attendant application will use monitored transfers, program FORWARD-NO ANSWER on subscriber telephones. If the application will use blind transfers, program FORWARD-BUSY/RNA on subscriber telephones. As an alternate method of programming for subscriber stations, build a call rerouting table.
Integration Te c h n i c a l Note 13 Installing the Dialogic D/82 Physical Interface Each Dialogic D/82JCT-U card connects to the PBX with a Dialogic D/82-U PBX interface cable assembly. One end of the cable is a 25-pair male RJ-21 connector; the other end is a Dialogic mini-D 36-pin connector that plugs into the connector on the end plate of the Dialogic D/82 linecard. Table 3 shows the wiring connections for the DNIC digital stations. The stations connect to the even numbered pairs only.
Integration 14 Te c h n i c a l Note Programming Dialogic Configuration Manager By default, the Dialogic Configuration Manager for software version SR5.01.2 sets the parameter PBXSwitch type to Nortel_Norstar. This parameter must be changed to the appropriate PBX type you are integrating with OneBox. Follow these steps to change the parameter for each D/82JCT-U linecard installed: 1. Click Start, point to Programs, point to Dialogic System Software, and select Dialogic Configuration Manager-DCM. 2.
Integration Te c h n i c a l Note 15 Configuring OneBox Once the telephone system is programmed, you must configure OneBox for the integration. During setup, you’ll need the following information, specific to this integration, to configure OneBox. 1. In the Installation Configuration dialog box, enter the name of your site in the Site Name box, the mailbox length in digits in the Mailbox Length box, and the first extension number for the first line in the First Extension box.
Integration 16 Te c h n i c a l Note Completing the Integration Now you are ready to complete the OneBox UM installation. See the guides Installing OneBox and Administering OneBox, or the OneBox online help system, for instructions. For general information on integrations, you may also wish to consult “Integrating OneBox with the Telephone System,” in the Installing OneBox guide, and the topic “Integrate the Telephony Server with the telephone system,” in the online help system.