
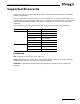
Technical data

Installing the Software
page 12
Installing the Software
This section explains how to perform a new installation of Eiconcard Connections for Windows.
If you are upgrading a previous installation, see Upgrading a Previous Installation
on page 15.
Before installing
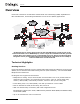
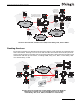
Before you install the Eiconcard Connections for Windows software, you must install at least
one Eiconcard into the computer on which you will install the software. You can install as many
as six Eiconcards in the same computer (with a maximum of 16 ports used by Routing
Services). This enables you to support different types of connections through a single Eiconcard
Connections for Windows computer.
Note: The computer with the Eiconcard(s) and Eiconcard Connections software is referred to
in the documentation as an Eiconcard Connections for Windows computer.
The computer you choose must meet the minimum system requirements described in System
Requirements on page 9. For information on how to install an Eiconcard into a computer,
consult the installation guide included with your Eiconcard.
After you have installed the Eiconcard(s), you can install Eiconcard Connections for Windows
software components from the Eiconcard Connections for Windows product folder. By default
it is C:\C4W_x86 or C:\C4W_x64. Before you install the software, it is recommended that you
read the Release Notes. See Getting Help
on page 7 for the location of the Release Notes.
After you have installed the Eiconcard Connections for Windows software, information on how
to configure and use the software is available in the online guide (
ECGUIDE.CHM). See Online
Guides on page 7 for more information.
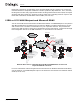
The Eiconcard Connections for Windows product folder also includes the SNA Link Server
Drivers that enable Microsoft Host Integration Server to operate through your Eiconcard to
make SNA connections. For information on how to install the SNA Link Server Drivers, refer
to the online guides.
Installation of the Eiconcard software is different depending on whether you are running
Windows 2000 or any of the other supported Windows operating systems. Refer to the
appropriate section below.
Installing under Windows XP and Later
1. Ensure that you have installed and connected the Eiconcard in your computer as described
in the installation guide included with your Eiconcard.
2. Start your computer and log on as Administrator or equivalent. Windows will detect the
new hardware and start the ‘Found New Hardware Wizard’.
3. Browse to the Eiconcard Connections for Windows product folder. By default C:\C4W_x86
or C4W_x64.
4. Click Next and follow the instructions that appear on the screen.