
Technical data


Software Installation
Dialogic
®
Diva
®
System Release 8.5.6WIN Reference Guide page 26
To install the software
Important for Dialogic
®
Diva
®
softIP software: If you chose to activate your license via the USB dongle,
which came with your Dialogic
®
Diva
®
softIP software package, do not plug the dongle into the USB port on
your computer until the Dialogic
®
Diva
®
softIP software installation is complete.
Note: If multiple Dialogic
®
Diva
®
Media Boards are installed, the wizard will be visible only once for each update
or configuration of the software. The configured parameters correspond to all Diva
Media Boards.
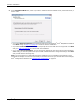
1. From the Windows
®
task bar, click Start > Run.
2. Enter the path to the update file on the hard disk, e.g.
C:\Temp\DIVA
(where C: is the hard disk drive letter)
3. In the welcome dialog box, click Next to start updating the drivers for all installed Diva Media Boards.
Note: If you installed a Diva
Media Board that is not supported with this software version, the Unsupported
Board box appears. For supported Diva Media Boards, see Supported Dialogic
® Diva® Media Boards on
page 20. This software version currently supports only the boards listed there.
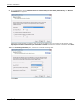
4. The License Agreement box appears. Read the license agreement carefully. If you understand it and accept
its terms, select I accept the above license agreement and click Next. If you do not understand and/or
accept its terms, click Cancel to exit the process. You need to accept the license agreement to be able to
update the drivers.
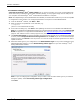
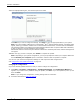
5. Select the switch type for your configuration in the Default Switch Type box if you have a Dialogic
®
Diva
®
ISDN Media Board installed, or in the Default Analog Switch Type box if you have a Dialogic
®
Diva
®
Analog Media Board installed.
Note: If you are changing the configuration and you want to use the same switch type as you selected
during the update, select Use existing switch type configuration.
Click Next.