
Owner's manual

Document No: 9100-127-1231-99
Issued: November, 2011
Sheet 2 of 2
INSTALLATION INSTRUCTIONS and PARTS LIST
SINGLE, DUAL and RETRO FIXTURES
MINI L-810 OBSTRUCTION LIGHT
-------------------------------------------------------------------------------------------------------------------------------------------
-------------------------------------------------------------------------------------------------------------------------------------------
1501 Route 34 South, Farmingdale, NJ 07727 Tel: [732] 919-3119 Fax: [732] 751-5778 www.dialight.com
RETRO INSTALLATION STEPS:
► Remove existing lens and clamp 6 from existing fixture
► Do not discard clamp 6 since it will be used to secure light assembly 1A .
► Remove and discard all internal components required for use with incandescent bulb
► Leave only the source wires that le
ad into the existing base 2C .
► Electrically connect the supply wires to the light assembly 1A wires
same as SINGLE FIXTURE installation
► Tuck the connected wires inside the existing base 2C .
► Place light assembly 1A on existing base 2C and secure using existing clamp 6 .
► Restore power and verify operation
RETRO ONTO 3/4-14 NPT CONDUIT INSTALLATION STEPS:
► Electrically connect the supply wires to the light assembly 1A wires
same as SINGLE FIXTURE installation
► Use a 1-1/4” wrench to tighten and attach the light assembly 1A to the conduit
► Restore power and verify operation
Please refer to product data sheet for electrical parameters if required
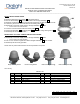
Single Housing Fixture Dual Housing Fixture Retro Fixture [Housing] Retro Fixture [Conduit]
Patent Pending
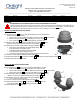
PARTS LIST
Item Part No. Description Item Part No. Description
1 . Light Assembly (w/ Adapter) 3 . 1/4-20 x ½ Holding Screw
1A . Light Assembly (w/o Adapter) 4 . 1” Plug
2A 860-1000 Single Housing 5 . 1” to 3/4" Bushing
2B 860-2000 Dual Housing 6 . Existing Installed Clamp
2C . Existing Installed Housing . .
Rev ECO No Drn Chk App CM Date
E 5156 AV ALV SM JB 12-2-11