
User Manual


User Manual-5.0
97
Highlighter
On the ‘Design Album’ window, select the photo you wish to modify, then click on and select the
option ‘Highlighter’.
The highlighter option helps to make any subject of your wish stand out in color against a black-and-white
background.
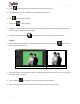
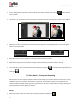
Once the photo is selected and ‘Highlighter’ option chosen, the photo, initially in color, opens in black and
white on the ‘Highlighter’ page (Image 6.2.4).
(a)
(a)
Image 6.2.4: Highlighter (a) before (b) after
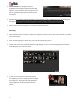
Adjust the brush size, feather and opacity using their respective sliders or by entering the values in the
value boxes.
Move the brush over the area you want to be highlighted. That segment now appears in color and the
remaining parts stay in black and white (Image 6.2.4 (b)).
Keep the Ctrl key pressed to activate the correction mode in case you need to undo your highlighting.
To see how the photo looked before and after the change, clicks on and
respectively.
You could save a copy of the photo with the changes by clicking on or overwrite the original photo by
clicking on .