
User Manual

const int InfraredSensorPin = 4;//Connect the signal pin to the digital pin 4
const int LedDisp = 13;
void setup()
{
Serial.begin(57600);
Serial.println("Start!");
pinMode(InfraredSensorPin,INPUT);
pinMode(LedDisp,OUTPUT);
digitalWrite(LedDisp,LOW);
}
void loop()
{
if(digitalRead(InfraredSensorPin) == LOW) digitalWrite(LedDisp,HIGH);
else digitalWrite(LedDisp,LOW);
Serial.print("Infrared Switch Status:");
Serial.println(digitalRead(InfraredSensorPin),BIN);
delay(50);
}
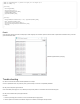
Result
Cover the sensor head with your hand, the LED(Pin13) on board will light up, hold it toward an open area, the LED will be off. Open Arduino IDE serial monitor, you can also
get the Infrared sensor status.
(/wiki/index.php/File:Sen0019_result.png)
Trouble shooting
Q 1. We have to use manual, because describes explanation is too simple?
A: This is a photoelectric switch, only three lines, power, ground and output, so have not too complicated presentation.
Q 2. Why Connect the power, light has been lit?
A: To ensure stable power supply is 5V ± 2%, followed by the output of the probe is not connected to the microcontroller output port.
Q 3. Why connect infrared switch power, light has been lit?
A: .Please
1. Check the power supply has not reversed, in a word, the infrared output to supply positive;
2. check the probe is in the direction of the detection range that is no obstacle, the best against the open direction.