Industrial OPL Stack Dryers 30 and 50 Pound OPL Stacked Dryers Programming Instructions Starting serial number 213228 8533-069-001
Part # 8533-069-001 12/13
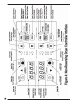
Touch Pad Description Indicator Lights (LED’s) Cycle (1 through 5) Gas Valve Programming Stop Switches (push buttons) Up/Increase Down/Decrease Description These L.E.D.s are on solid when a particular cycle is chosen for operation or programming. This L.E.D. is part of the 4-digit numeric display and will be on solid during the drying part of a cycle when the gas valve does not need to be on. The L.E.D. will be blinking when the gas valve needs to be on. The L.E.D.
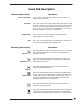
Start Message Description LOAd This message is displayed after a dry cycle is complete and the dryer loading door has been opened or the STOP touch pad key on the dryer controller has been pressed and released twice. donE This message blinks immediately after completion of the dry cycle and continues to blink until the stop key on the dryer controller touch pad is pressed or the dryer loading door is opened. Prog This message is displayed when entering the permanent programming mode. .
Operating Instructions To dry a load of items, you must choose one of the five-programmed dry cycles. Each of these five dry cycles may be modified in two different ways to match your load. Please refer to the “Permanent Dryer Controller Programming” or “Temporary Dryer Controller Programming” section of this manual. There are two parts to each dry cycle. The first part is the heating time, which is when the gas valve is cycled on and off according to the temperature setting in the dry cycle program.
During the dry cycle, either pressing the STOP touch pad key on the dryer controller or opening the dryer loading door, will stop the dry cycle and not clear it. If you press the STOP touch pad key on the controller and then open the dryer loading door the dry cycle will not be cleared.
Procedure 1. Make sure the dryer is not in a dry cycle. The 4-digit numeric display on the dryer controller will show “LOAd” when the dryer is not in a dry cycle. 2. Press and release the UP or DOWN arrow keys on the dryer controller touch pad to chose the dry cycle that you want to change (dry cycle 1 through 5). The dry cycle L.E.D. will illuminate to indicate which dry cycle you are choosing. If you press either arrow key and hold it down, the controller will sequence through the five dry cycles. 3.
Temporary Dryer Controller Programming Example Requirements: Dry a load with 40 minutes of actual heat at 18SoF and five minutes of cool down. The following procedure will show you how to temporarily modifY the existing dry cycle 1 program for one cycle of drying. It is based on the assumption that the factory defaults have not been permanently changed. If they have been changed, the steps of this procedure will be the same, but the values that are displayed will be different.
controller circuit board. It is labeled and located at the lower middle side of the printed circuit board, as you face the component side of the board. It must be pressed and held down for at least three seconds. To permanently change a dryer controller cycle, follow the procedure below. Things that are displayed on the 4-digit numeric display will be in “quotation marks”. Keys on the touch pad that physically need to be pressed will be in CAPITAL AND BOLD LETTERS.
Press and release the SELECT/ENTER key. Once this key is pressed and released, the cool down L.E.D. will switch off, the dry cycle L.E.D. and programming L.E.D. will remain on, and the 4-digit numeric display will change to “Prog”. Press and release the STOP key to save the cycle program and escape the programming mode. If you want to change the same dry cycle program again, press the SELECT/ENTER key and continue at step 6 of this procedure.
9. Press and release the DOWN arrow touch pad key twice until the dryer controller display shows the number “3”. 10. Press and release the SELECT/ENTER touch pad key. The dry time L.E.D. and the programming L.E.D. will remain on and the cool down L.E.D. will switch off. The dryer controller display will change to “Prog”. 11. Press and release the STOP touch pad key. The dry time L.E.D. will remain on and the programming L.E.D. will switch off. The dryer controller display will change to the word “LOAd”.