
User`s guide


62 | Dexcom G4 PLATINUM (Pediatric) Continuous Glucose Monitoring System
6
6. Save the safety lock to help you remove the transmitter at the end
of your sensor session. The safety lock can be used for transmitter
removal but is not required. When your glucose monitoring session
is over, follow the steps in Chapter 11, Section 11.3, Transmitter
Removal, with or without the safety lock.
NOTE:Contactyourhealthcareprofessionalforspecicquestions
regarding the use of medical tape, barrier wipes and/or other adhesives
as it relates to your use of Dexcom CGM.
6.5 SENSOR INSERTION
You are ready to insert the sensor after you place the applicator on
your skin and remove the safety lock. To insert your sensor follow
these steps:
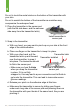
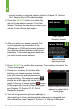
1.Placethengersofonehandattheedgeofthewhiteadhesive(atthe
opposite side of the sensor from the transmitter latch). You may pinch
up on your skin using this hand. Do not pinch up in the middle section
of the plastic base.
2.Whilestillpinching,useyourotherhandtoplacetwongersabove
the collar on the applicator barrel so they are resting above the collar.
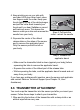
3. Place your thumb on the white plunger. Push the plunger down
completely,makingsureitisushagainsttheapplicatorbarrel.You
should hear 2 clicks. This inserts the needle and sensor under
your skin.
When you are pushing down on the plunger, do not pull back on
the collar.
“2 CLICKS”
Steps 1-3. Push down the plunger - insert the needle and sensor