
User's Manual


G4-Global System User’s Guide | 39
3.5 SENSOR INSERTION
Once you have placed the Applicator on your belly and removed the Safety Lock
(see Section 3.4), you are ready to insert the Sensor. Follow these 4 steps to
successfully insert your Sensor.
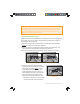
1. Hold down the Pod with one hand. With your other hand, place two fi ngers
above the collar on the barrel of the Applicator.
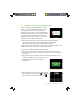
2. Place your thumb on the plunger. Push the plunger down completely. This
action inserts the needle and Sensor Probe under your skin.
When you are pushing down on the plunger, do not pull back on the collar.
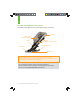
3. To remove the needle, keep holding the
Sensor Pod with one hand. With your other
hand, place two fi ngers under the collar.
Then pull the collar back towards your
thumb. Stop when you hear 2 “clicks” or
cannot pull back any more. This step pulls
the needle back into the Applicator and
keeps the Sensor Probe under your skin.
a. Remember to do this in the correct order:
push plunger down, then pull collar up.
HELPFUL HINT: The Safety Lock also serves as the Transmitter Key that is
used later for Transmitter removal. Keep this piece to help you remove the
Transmitter at the end of a continuous glucose monitoring session. When
your glucose monitoring session is over, follow the steps in Chapter 6,
Section 6.4 to remove the Transmitter.
“ 2 CLICKS”
Pull back the collar - Retract
the Needle
“CLICK”
Push down the plunger – Insert the Needle and Sensor Probe